 Honda Accord: Grab Handle Removal/Installation
Special Tools Required
KTC Trim Tool Set SOJATP2014*
*Available through the Honda Tool and Equipment Program; call 888-424-6857
NOTE: - Use the appropriate tool from the KTC trim tool set to avoid damage when removing components.
- When prying with a flat-tip screwdriver, wrap it with protective tape to prevent damage.
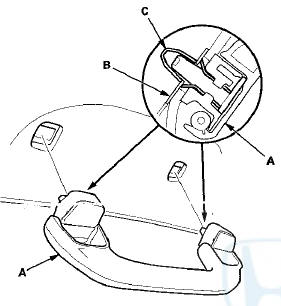
1. Lower the grab handle (A), then insert a small flat-tip screwdriver into the notch.
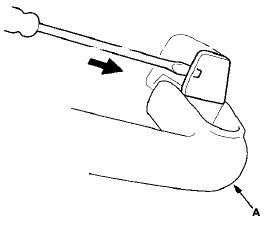
2. Pull on the small flat-tip screwdriver with the appropriate trim tool (A), and remove the cap (B).
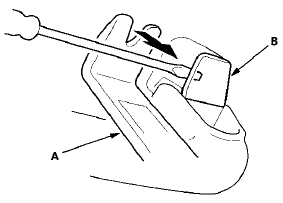
3. Pinch the clips (A) to release the hooks (B), then remove the grab handle (C).

4. Pinch the hooks on the clips (A) with a pair of pliers, and pull out the clips of the bracket.
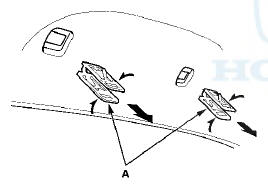
5. If the side curtain airbag has deployed, replace the grab handle with a new one. (see page 24-208) 6. If the side curtain airbag has not deployed,inspect the grab handle for damage. A damaged grab handle may cause the side curtain airbags to deploy improperly, possibly causing injury. Replace the grab handle if it has any of the following damage: - Any cracks or damage in the grab handle (A).
- Any cracks or stress-whitening in the caps (B).
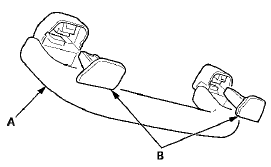
7. Install the clips (A) on the grab handle (B), then insert the caps (C) fully into the clips.
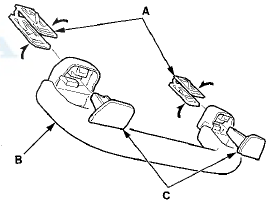
8. Position the grab handle (A) on the mounting bracket (B), and push on the grab handle until the clips (C) snap into place securely
 Sunvisor Removal/Installation
NOTE:
- Put on gloves to protect your hands.
- Take care not to bend or scratch the headliner.
- When prying with a flat-tip screwdriver, wrap it with
protective tape to prevent damage.
1. ...
 Headliner Removal/Installation
Special Tools Required
KTC Trim Tool Set SOJATP2014*
*Available through the Honda Tool and
Equipment
Program; call 888-424-6857
SRS components are located in this area. Review the
SRS component ...
See also:
Compass Calibration
The compass may need to be
manually calibrated after exposure to
a strong magnetic field. If the
compass seems to be continually
showing the wrong direction and is
not self-calibrating, or ...
Playing Internet Radio
Connect a compatible phone through Bluetooth®.
You can also connect the phone using your dock connector to the USB port.
Make sure the audio setting is correct for the connection type.
Select ...
Fluid Replacement
Check the reservoir (A) at regular intervals, and add the
recommended fluid as necessary. Always use Honda
Power Steering Fluid. Using any other type of power
steering fluid or automatic transmissi ...