 Honda Accord: General Troubleshooting Information
How to Check for DTCs with the HDS
There are three methods used to check for DTCs. The recommended method is to use the Honda Diagnostic System (HDS) with the appropriate software, plugged into the data link connector (DLC).
The second method is to run the self-diagnostic function built into the climate control unit.
The third method is to use the B-CAN system diagnostic test mode A (see page 22-134).
1. Make sure the ignition switch to LOCK (0).
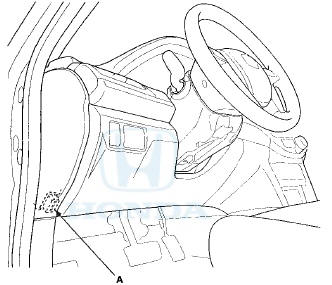
2. Connect the HDS to the data link connector (DLC) (A) located under the driver's side of the dashboard.
3. Turn the ignition switch to ON (II).
4. Make sure the HDS communicates with the vehicle and the climate control unit. If it doesn't, troubleshoot the DLC circuit (see page 11-181).
5. Select HVAC/CLIMATE CONTROL in the BODY ELECTRICAL menu.
6. Select DTCs in the HVAC/CLIMATE CONTROL menu.
7. Check for DTCs. If any DTCs are indicated, write down the DTCs, then go to the indicated DTC troubleshooting. If no DTCs are indicated, refer to symptom troubleshooting.
NOTE: • After troubleshooting, clear the DTCs with the HDS.
• For specific operations, refer to the user's manual that came with the HDS.
How to Use the Self-diagnostic Function with the HDS
1. Make sure the ignition switch to LOCK (0).
2. Connect the HDS to the data link connector (DLC).
3. Turn the ignition switch to ON (II).
4. Make sure the HDS communicates with the vehicle and the climate control unit. If it doesn't, troubleshoot the DLC circuit (see page 11-181).
5. Select HVAC/CLIMATE CONTROL in the BODY ELECTRICAL menu.
6. Select INSPECTION in the HVAC/CLIMATE CONTROL menu.
7. Select CLIMATE CONTROL SELF TEST in the INSPECTION menu.
8. Check lor DTCs. If any DTCs are indicated, write down the DTCs, then go to the indicated DTC troubleshooting.
NOTE: • After troubleshooting, clear the DTCs with the HDS.
• For specific operations, refer to the user's manual that came with the HDS.
How to Use the Self-diagnostic Function without the HDS
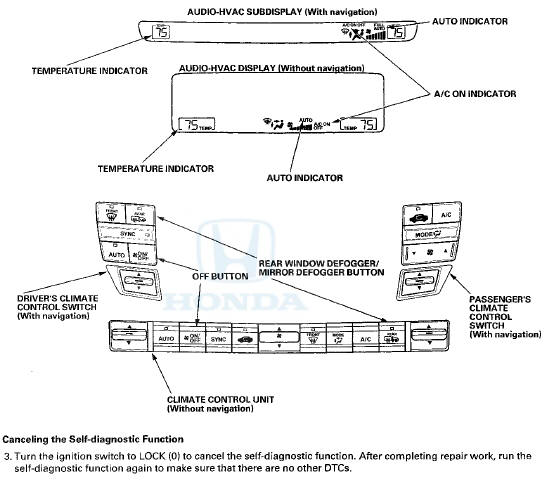
The climate control unit has a self-diagnostic function. To run the self-diagnostic function, do the following: 1, Turn the ignition switch to LOCK (0), and then to ON (II).
2. Press and hold the OFF button, then within 10 seconds press and release the REAR WINDOW DEFOGGER/MIRROR DEFOGGER button five times. Release the OFF button; then the self-diagnostic begins.
NOTE: • The blower motor will run at various speeds regardless of what the panel is displaying.
• If there is a problem with the system, the temperature indicator flashes 88, and the A/C ON indicator or the AUTO indicator (or both) also flashes. Segments in the temperature indicator then indicate which DTCs are present.
• If there is more than one DTC, they are displayed one at a time in sequence followed by a pause (all the display indicator segments illuminate) between the DTCs.
• If there are no problems detected, the segments will not illuminate, and the system will appear to be turned off.
'08-09 models
'10 model
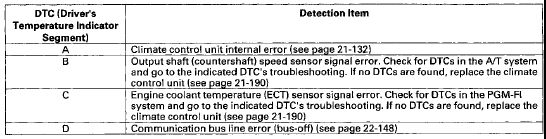
Checking for DTCs
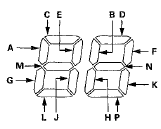
The temperature display indicates single or multiple DTCs. If no DTCs are present, the indicator remains blank.
NOTE: If indicator segments A, C, D, E, G, K, and the AUTO indicator or the A/C ON indicator, are on at the same time, there may be an open in the climate control unit ground circuit
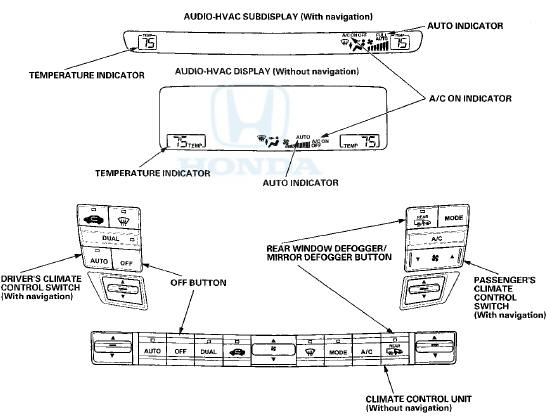
DRIVER'S TEMPERATURE INDICATOR
AUTO INDICATOR

A/C ON INDICATOR


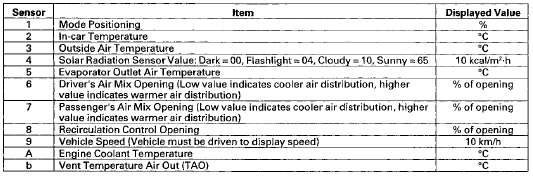
Displaying Sensor Inputs at the Climate Control Unit
The climate control unit has a mode that displays sensor inputs it receives. This mode shows you what the climate control unit is receiving from each of the sensors, one at a time, and it can help you determine if a sensor is faulty.
Check these items before using the sensor input display mode
1 _ Turn the ignition switch to ON (II), and check the recirculation door function; press the recirculation button to switch from FRESH to RECIRC. The air volume and sound should change slightly.
2. Set the temperature using the driver's control switch to the desired test temperature: • Press AUTO button on, the LED turns on.
• '08-09 models; Press DUAL button off, the LED turns off.
• '10 model; Press SYNC button off, the LED turns off.
When selecting the test temperature, note these items: • "Lo" temperature setting will default to MAX COOL, VENT, and RECIRC.
• "Hi" temperature setting will default to MAX HOT, FLOOR, and FRESH.
• 58 through 86 °F settings will use the automatic climate control logic.
3. Turn the ignition switch to LOCK (0).
To run the sensor input display mode, follow these steps
1. Turn the ignition switch to LOCK (0).
2. Press and hold both the AUTO and RECIRCULATION CONTROL buttons, then start the engine.
3. After the engine starts, release both buttons. The audio-HVAC display will flash the sensor number, and then the value for that sensor. Record the value displayed.
4. To advance to the next sensor, press the REAR WINDOW DEFOGGER button.
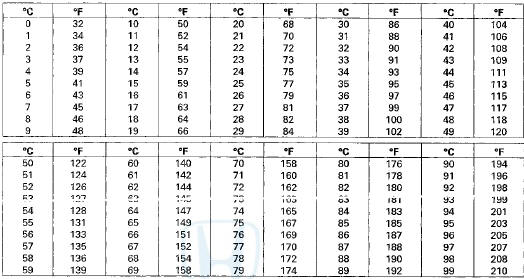
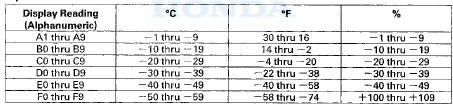
NOTE: • The sensor values will be displayed in degrees Celsius (°C) or an alphanumeric code. Use the chart to convert the value to degrees Fahrenheit (°F).
• If the sensor value displays "Er" this indicates there is an open or short in the circuit or sensor. Check for DTCs using the HDS, or use the climate control self-diagnostic function.
• If necessary, compare the sensor input display to a known-good vehicle under the same test conditions.
• If the sensor is out of the normal range, refer to the sensor test or substitute a known-good sensor, and recheck.
Celsius to Fahrenheit Conversion Table
Alphanumeric Conversion Table
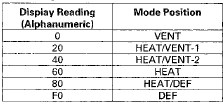
Alphanumeric Conversion Table (Mode Positioning)
5. To cancel the sensor input display mode, press the AUTO button or turn the ignition switch to LOCK (0).
 Component Location Index
'10 model
With navigation
Without navigation
...
 DTC Troubleshooting Index
Checking the DTCs by HDS
*:'10 model ...
See also:
Passenger's Airbag Cutoff Indicator Replacement
1. With navigation: Remove the dashboard center vent
(see page 20-178).
2. Without navigation: Remove the audio unit (see page
23-114).
3. Disconnect the 6P connector (A) from the passenger's
...
Ignition Key Light Test
1. Remove the steering column upper and lower covers
(see page 20-181).
2. Disconnect the 6P connector (A).
3. The LED should come on when power is connected to
terminal No. 6 and ground is co ...
Defaulting All the Settings
Reset all the menu and customized settings as the factory defaults.
1. Press the SETTINGS button.
1. Press and hold the DISP button.
2. Rotate to select System
Settings, then
press .
...