 Honda Accord: Front Seat Frame Replacement
Driver's Seat
Honda Accord: Front Seat Frame Replacement
Driver's Seat
Special Tools Required
KTC Trim Tool Set SOJATP2014*
*Available through the Honda Tool and Equipment Program; call 888-424-6857
SRS components are located in this area. Review the SRS component locations, 2-door (see page 24-23), 4-door (see page 24-21) and the precautions and procedures (see page 24-25) before doing repairs or service.
NOTE: - Put on gloves to protect your hands.
- Use the appropriate tool from the KTC trim tool set to avoid damage when removing components.
- If the side airbag has deployed, replace the seat frame and related parte with new onee.
1. Remove the front seat (see page 20-194).
2. Remove these items: - Front seat-back cover/pad: - 2-door (see page 20-213) - 4-door (see page 20-221) - Front seat cushion cover/pad: - 2-door (see page 20-226) - 4-door (see page 20-234) - Seat belt buckle: - 2-door (see page 24-7) - 4-door (see page 24-13) - Seat position sensor (see page 24-239) - Side airbag (see page 24-215)
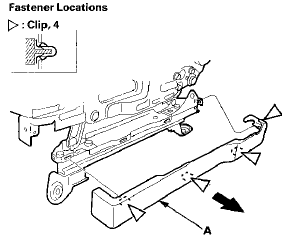
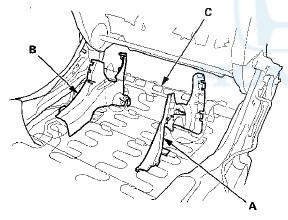
3. Detach the clips, then remove the outer cover (A).
10-way power seat
Manual height adjustable seat
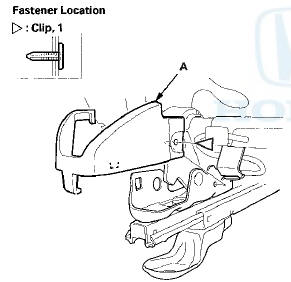
4. Detach the clip(s), then remove the inner cover (A).
10-way power seat
Manual height adjustable seat
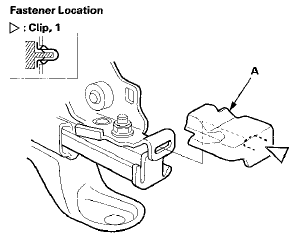
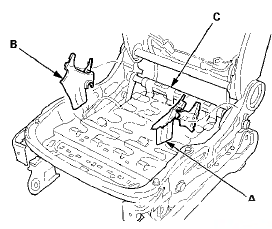
5. Remove the recline inner cover (A) and the center inner cover (B) from the seat frame (C).
10-way power seat
Manual height adjustable seat
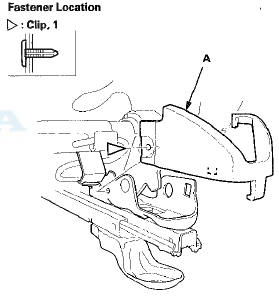
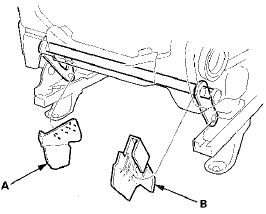
6.10-way power seat: Remove the rear gear outer cover (A) and the rear gear inner cover (B).
7. Install the seat frame in the reverse order of removal, and note these items: - If the clips are damaged or stress-whitened, replace them with new ones.
- Push the clips into place securely.
 Rear Seat Access Cable Replacement
2-door Passenger's Seat
NOTE:
- Put on gloves to protect your hands.
- Take care not to kink the rear seat access cable.
- The right rear seat access cable is shown; the left rear
seat access ...
 Front Seat Frame Replacement - Passenger's Seat
Special Tools Required
KTC Trim Tool Set SOJATP2014*
*Available through the Honda Tool and
Equipment
Program; call 888-424-6857
2-door
SRS components are located in this area. Review the
SRS c ...
See also:
Trunk Lid Latch Switch Test
1. Open the trunk lid.
2. Disconnect the 3P connector (A) from the trunk lid
latch assembly (B).
3. Check for continuity between terminals No. 1 and No.
2.
• There should be continui ...
Rearview Camera
About Your Rearview Camera
The audio/information screen can display your vehicle’s rear view.
The display automatically changes to a rear view when the shift lever is
moved to
(R.
The rear ...
Front Door Latch Replacement
NOTE: Put on gloves to protect your hands.
1. Remove the door panel and the inner handle:
- 2-door ( s e e p a g e 20-12)
- 4-door (see page 20-17)
2. Remove the plastic cover, as needed (see st ...