 Honda Accord: Front Door Weatherstrip Replacement
NOTE: - Put on gloves to protect your hands.
- Take care not to scratch the door.
- Take care not to damage the front upper corner clip (black) (4-door) and the rear upper corner clips (black) because they are not available separately.
- Use a clip remover to remove the clips.
1. Remove the door checker mounting bolt (A) at the A-pillar.
2-door
4-door
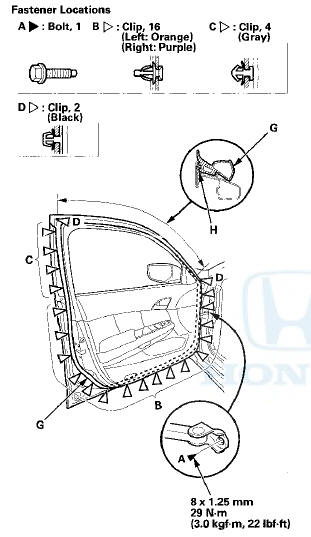
2. Detach the clips (B, C, D, E, F), and release the door weatherstrip (G) from the holder (H) of the door sash, then remove the weatherstrip.
3. Install the weatherstrip in the reverse order of removal, and note these items: - If the clips are damaged or stress-whitened, replace them with new ones.
- Push the clips into place securely.
- Make sure the door weatherstrip is installed in the holder securely.
- Apply medium strength liquid thread lock to the door checker mounting bolt before installation.
- Check for water leaks (see step 9 on page 20-57).
 Front Door Outer Molding
Replacement
Front Door Outer Molding
Replacement
Special Tools Required
KTC Trim Tool Set SOJATP2014*
*Available through the Honda Tool and
Equipment
Program; call 888-424-6857
NOTE:
- If you remove the door outer molding, replace it with a
...
 Rear Door Panel Removal/Installation
Special Tools Required
-KTC Trim Tool Set SOJATP2014
- Trim Pad Remover Snap-on A 177A, commercially
available
*Available through the Honda Tool and
Equipment
Program; call 888-424-6857
4-door ...
See also:
Front Door Glass and Regulator
Replacement
NOTE: Put on gloves to protect your hands.
1. Remove the door panel:
- 2-door (see page 20-12)
- 4-door {see page 20-17)
2.2-door: Remove the screws, then remove the door
panel bracket (A).
...
Alternator Overhaul
Exploded View
Special Tools Required
- Driver Handle, 15 x 135L 07749-0010000
- Bearing Driver Attachment, 42 x 47 mm 07746-0010300
NOTE: Refer to the Exploded View as needed during this
proced ...
Driveshaft Inspection
1. Check the inboard boot (A) and the outboard boot (B)
on the driveshaft (C) for cracks, damage, leaking
grease, and loose boot bands (D). If any damage is
found, replace the boot and the boot ban ...