 Honda Accord: Drive Belt Auto-tensioner
Inspection
Honda Accord: Drive Belt Auto-tensioner
Inspection
Special Tools Required
Belt Tension Release Tool Snap-on YA9317 or equivalent, commercially available
1. Turn the ignition switch to ON (II), and make sure to turn the A/C switch OFF. Turn the ignition switch to LOCK (0).
2. Check the position of the auto-tensioner indicator's pointer (A). Start the engine, then check the position again with the engine idling. If the position of the indicator moves or fluctuates very much, replace the auto-tensioner (see page 4-31).
3. Check for abnormal noise from the tensioner pulley. If you hear abnormal noise, replace the auto-tensioner pulley (see page 4-32).
4. Remove the drive belt (see page 4-30).
5. Move the auto-tensioner within its limit with the belt tension release tool in the direction of the rotation arrow. Check that the auto-tensioner moves smoothly and without any abnormal noise. If the auto-tensioner does not move smoothly, or if you hear abnormal noise, replace the auto-tensioner (see page 4-31).
6. Remove the auto-tensioner (see page 4-31).
7. Clamp the auto-tensioner (A) by using two 8 mm bolts (B) and a vise (C) as shown. Do not clamp the auto-tensioner itself.
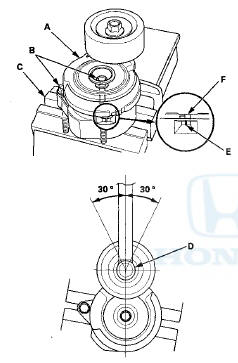
8. Attach the torque wrench (D) on the pulley bolt, and align it as shown.
9. Align the auto-tensioner indicator's pointer (E) on the auto-tensioner base with Max. belt position mark (F) on the auto-tensioner arm by using the torque wrench, and measure the torque. If the torque value is out of specification, replace the auto-tensioner (see page 4-31).
NOTE: If the auto-tensioner indicator's pointer exceeds the Max. belt position mark, recheck the torque.
Auto-tensioner Spring Torque: 33.1 - 4 0 . 5 N-m (3.38-4.13 kgf-m, 24.4-29.9 Ibfft)
 Drive Belt
Removal/Installation
Drive Belt
Removal/Installation
Special Tools Required
Belt Tension Release Tool Snap-on YA9317 or
equivalent, commercially available
1. Move the auto-tensioner (A) with the belt tension
release tool (B) in the direction of the ...
 Drive Belt Auto-tensioner
Removal/Installation
Drive Belt Auto-tensioner
Removal/Installation
1. Remove the drive belt (see page 4-30).
2. Remove the power steering (P/S) fluid reservoir from
the holder.
3. Remove the P/S pump (A) without disconnecting the
P/S hoses, then remove the P/ ...
See also:
Symptom Troubleshooting Index
When the vehicle has one of these symptoms, check for VSA diagnostic trouble
codes (DTCs) with the HDS. If there are
no DTCs, do the diagnostic procedure for the symptom, in the sequence listed,
...
Component Location Index - Front Door
2-door
4-door
...
Ignition Switch
WARNING
Removing the key from the ignition switch
while driving locks the steering. This can
cause you to lose control of the vehicle.
Remove the key from the ignition switch
only when p ...