 Honda Accord: Combination Light Switch
Test/Replacement
Honda Accord: Combination Light Switch
Test/Replacement
1. Remove the driver's dashboard lower cover (see page 20-166).
2. Remove the steering column covers (see page 17-10).
3. Disconnect the 12P connector (A) from the combination light switch (B).

4. Remove the two screws, then slide out the combination light switch.
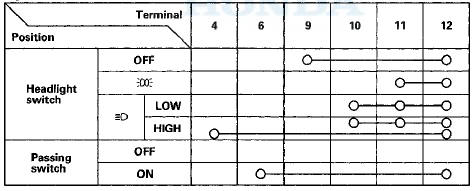
5. Inspect the connector terminals to be sure they are all making good contact.
• If the terminals are bent, loose or corroded, repair them as necessary, and recheck the system.
• If the terminals look OK, check for continuity between the terminals in each switch position according to the tables.
Light switch
Turn signal switch
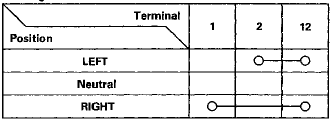
6. If the continuity is not as specified, replace the switch.
 MICU Input Test
NOTE:
• Before testing, troubleshoot the multiplex
integrated control unit first, using B-CAN System Diagnosis Test Mode A
{see page 22-134).
• Before testing, make sure the No. 15 (7 ...
 Headlight Adjustment
Headlights become very hot during use; do not touch
them or any attaching hardware immediately after
they have been turned off.
Before adjusting the headlights:
• Park the vehicle on a level ...
See also:
Valve Body
Valve Body and ATF Strainer
Installation
Exploded View
Torque Specifications:
6 x 1.0 mm: 12 N-m (1.2 kgf m, 8.7 Ibfft)
8 x 1.25 mm: 18 N-m (1.8 kgfm, 13 Ibfft)
NOTE: Refer to the Exploded Vie ...
Front Door Panel Removal/Installation
Special Tools Required
-KTC Trim Tool Set SOJATP2014*
-Trim Pad Remover Snap-on A 177A,
commercially
available
*Available through the Honda Tool and
Equipment
Program; call 888-424-6857
2-do ...
Security System
The security system helps to protect
your vehicle and valuables from theft.
The horn sounds and a combination
of headlights, parking lights, side
marker lights and taillights flashes if
someo ...