 Honda Accord: Front Door Panel Removal/Installation
Special Tools Required
-KTC Trim Tool Set SOJATP2014*
-Trim Pad Remover Snap-on A 177A, commercially available
*Available through the Honda Tool and Equipment Program; call 888-424-6857
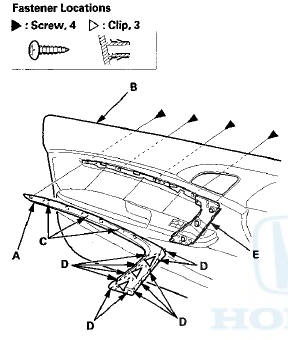
2-door
NOTE: -Take care not to scratch the door or the related parts.
- Use the appropriate tool from the KTC trim tool set to avoid damage when removing components.
1. Remove the tweeter cover (see step 2 on page 20-62).
2. Raise the glass fully.
3. Push on the bottom of the inner handle cap (A) while pushing on the upper hook (B) with the appropriate trim tool, then pull back the cap to remove it.
4. Remove the screws (A, B) securing the inner handle (C).
5. Remove the pull pocket cap (A), and remove the screw.
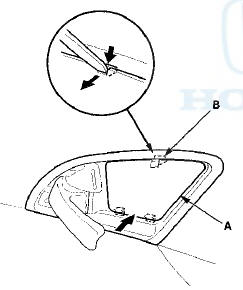
6. Pry up the notch (A) of the door panel cap (B), then pull back the cap to release the hooks (Cr D), then remove the cap.
7. Remove the screw. Disconnect the power window switch connector (E) and the power mirror switch connector (F).
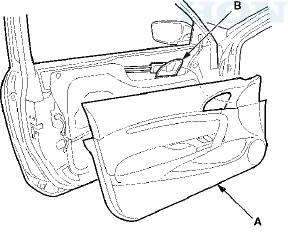
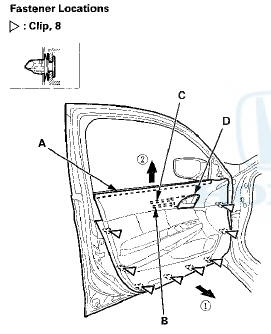
8. Remove the door panel (A) with as little bending as possible to avoid creasing or breaking it.
-1. Start at the bottom edge of the door panel, detach the clips with a commercially available trim pad remover.
-2. Detach the remaining clips.
-3. Starting at the rear, pull the door panel upward.
NOTE: The inner handle cable (B) and the latch cable (C) are connected to the inner handle (D). Do not pull the door panel up too far, or these cables will be damaged.
9. While holding the door panel (A) away from the door, remove the inner handle (B) from the door panel by releasing the hooks (C).
10. Remove the door panel (A) while pulling the inner handle (B) out through the hole in the door panel.
NOTE: If you are only removing the door panel, go to step 16. If you are doing further disassembly of the door panel, continue to step 11.
Inner handle removal
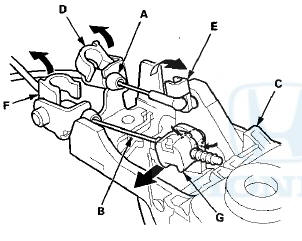
11. Disconnect the inner handle cable (A) and the latch cable (B) from the inner handle (C), then remove the handle.
-1. Release the inner handle cable fasteners (D, E), then disconnect the inner handle cable.
-2. Release the latch cable fastener (F), and remove the latch cable fastener (G) from the inner handle by pinching its tabs out.
NOTE: If the cable fasteners are damaged or stress-whitened, replace them with new ones.
Ornament panel removal
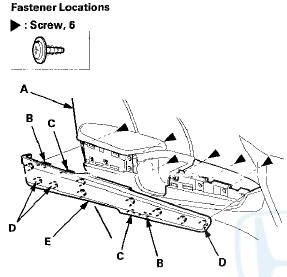
12. Remove the ornament panel (A).
-1. Remove the screws from back of the door panel (B).
-2. Release the hooks (C) from back of the door panel.
-3. Release the hooks (D) and the clips from the grip base (E).
13. Remove the screws {A, B, C), then separate the grip base (D) and the upper grip bracket (E) from the door panel (F).

Armrest removal
14. Remove the power window switch panel (A) and the armrest (B) as an assembly from the door panel (C).
-1. Remove the screws from back of the door panel.
-2. Pull out along the edge of the armrest to release all of the hooks (D).
-3. Pull out along the edge of the power window switch panel to release the hooks (E) and to detach the clips.
15. Remove the screws, and release the hook (A), then separate the power window switch panel (B) from the armrest (C).
16. Install the door panel in the reverse order of removal, and note these items: - If the clips are damaged or stress-whitened, replace them with new ones.
- Replace any damaged cable fasteners with new ones.
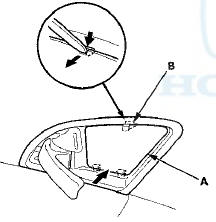
- The latch cable (A) should be fixed to the cable fastener (B) with the latch in the unlocked position as shown.
- Make sure each connector is plugged in properly, and the cables are connected securely.
- Make sure the power window and power door lock operate properly.
- When reinstalling the door panel, make sure the plastic cover on the door is installed properly .
- Push the clips and the hooks into place securely.
Special Tools Required
-KTCTrim Too! Set SOJATP2014*
- Trim Pad Remover Snap-on A 177A, commercially available
- Available through the Honda Tool and Equipment Program; call 888-424-6857
4-door
NOTE: - Take care not to scratch the door or the related parts.
- Use the appropriate tool from the KTC trim tool set to avoid damage when removing components.
- When prying with a flat-tip screwdriver, wrap it with protective tape to prevent damage.
1. Remove the tweeter cover (see step 2 on page 20-62).
2. Raise the glass fully.
3. Push on the bottom of the inner handle cap (A) while pushing on the upper hook (B) with the appropriate trim tool, then pull back the cap to remove it.
4. Remove the screws securing the inner handle (A).
5. Pry up the notch (A) of the lid (B), and pull back the lid, then remove the screw.

6. Remove the door panel (A) with as little bending as possible to avoid creasing or breaking it.
-1. Start at the bottom edge of the door panel, detach the clips with a commercially available trim pad remover.
-2. Detach the remaining clips.
-3. Starting at the rear, pull the door panel upward.
NOTE: The inner handle cable (B) and the latch cable (C) are connected to the inner handle (D). Do not pull the door panel up too far, or these cables will be damaged.
7. While holding the door panel (A) away from the door, remove the inner handle (B) from the door panel by releasing the hooks (C).
8. Remove the door panel (A) while pulling the inner handle (B) out through the hole in the door panel.
While holding the door panel away from the door, disconnect the power window switch connector (C), the power mirror switch connector (D), and the courtesy light bulb socket (E), and detach the harness clip (F).
NOTE: If you are only removing the door panel, go to step 13. If you are doing further disassembly of the door panel, continue to step 9.
Inner handle removal
9. Disconnect the.Inner handle cable (A) and the latch cable (B) from the inner handle (C), then remove the handle.
-1. Release the inner handle cable fasteners (D, EL then disconnect the inner handle cable.
-2. Release the latch cable fastener (F), and remove the latch cable fastener (G) from the inner handle by pinching its tabs out.
NOTE: If the cable fasteners are damaged or stress-whitened, replace them with new ones,
Power window switch panel removal
10. Remove the power window switch panel (A) from the door panel (B).
-1. Detach the clip.
-2. Pull out along the edge of the panel to release all of the hooks (C).
-3. Pull the power window switch panel rearward to release the front hook (D).
Armrest removal
11. Remove the screws (A), and loosen the screws (B) from back of the door panel (C). Release the hook (D), then remove the armrest (E).
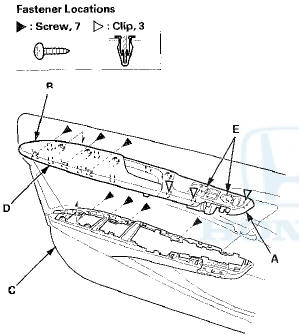
Ornament panel removal
12. Remove the screws from back of the door panel (A), and release the hooks (B, C, D), then remove the ornament panel (E).
13. Install the door panel in the reverse order of removal, and note these items: - If the clips are damaged or stress-whitened, replace them with new ones.
- Replace any damaged cable fasteners with new ones.
- The latch cable (A) should be fixed to the cable fastener (B) with the latch in the unlocked position as shown.
- Make sure each connector is plugged in properly, and the cables are connected securely.
- Make sure the power window and power door lock operate properly.
- When reinstalling the door panel, make sure the plastic cover on the door is installed properly .
- Push t h e clips and the hooks into place securely
 Component Location Index Rear Door
4-door
...
 Front Door Outer Handle Replacement
NOTE:
- Put on gloves t o protect your hands.
- Take care not to scratch the door.
1 . Remove the door panel:
- 2-door (see page 20-12)
- 4-door (see page 20-17)
2. Disconnect the power door ...
See also:
To Stop Playing Your iPod
To play the radio, press the FM/AM,
or button. Press the CD button
to switch to the disc mode. Press the
AUX button to switch back to the
iPod.
Disconnecting an iPod
You can disconnect the ...
Adjusting the Steering Wheel
The steering wheel height and distance from your body can be adjusted so that
you
can comfortably grip the steering wheel in an appropriate driving posture.
1. Pull the steering wheel adjustmen ...
Towing Your Vehicle
Your vehicle is not designed to be
towed behind a motor home. If your
vehicle needs to be towed in an
emergency. ...