 Honda Accord: Clutch Hose Replacement
NOTE: - Replace the clutch hose if it is twisted, cracked, or leaks.
- Use fender covers to avoid damaging painted surfaces.
- Do not spill brake fluid on the vehicle; it may damage the paint or plastic. If brake fluid does contact the paint or plastic, wash it off immediately with water.
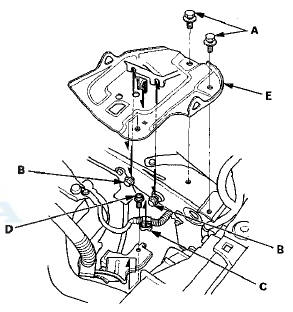
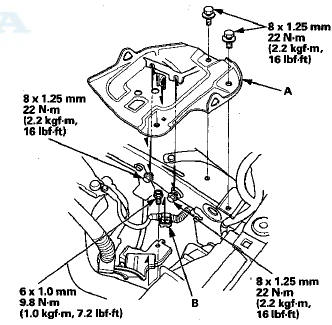
1. Do the battery removal procedure (see page 22-92).
2. Remove the battery base bolts (A), loosen the two bolts (B), remove the cable clamp (C), and the harness bracket bolt (D), then remove the battery base (E).
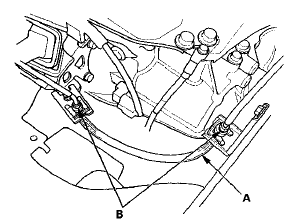
3. Disconnect the clutch hose (A) from the clutch lines (B).
4. Remove and discard the clutch hose clips (A) from the clutch hose (B).
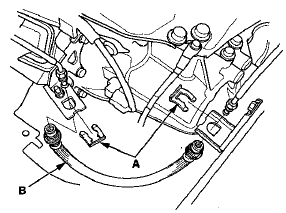
5. Remove the clutch hose from clutch hose brackets.
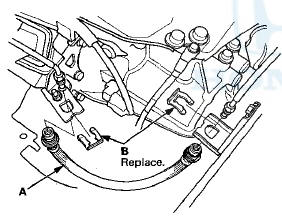
6. Install the clutch hose (A) into the clutch hose brackets with new clutch hose clips (B).
7. Connect the clutch lines (A) to the clutch hose (B).

8. Bleed the clutch hydraulic system (see page 12-6).
9. Do the following checks: - Check the clutch hose and line joint for leaks, and tighten if necessary.
- Check the clutch hose for interference and twisting.
10. Install the battery base (A) and the cable clamp (B).
11. Do the battery installation procedure (see page 22-92).
12. Test-drive the vehicle.
 Slave Cylinder Replacement
NOTE:
- Use fender covers to avoid damaging painted
surfaces.
- Do not spilt brake fluid on the vehicle; it may damage
the paint or plastic. If brake fluid does contact the paint
or plastic, wa ...
 Clutch Replacement
Special Tools Required
- Clutch Alignment Disc 07JAF-PM7011A
- Ring Gear Holder 07LAB-PV00100 or 07924-PD20003
- Clutch Alignment Tool Set 07PAF-0020000
- Clutch Alignment ...
See also:
Radio Data System (RDS)
On the FM band, you can select a
favorite station and display the
program service name provided by
the radio data system (RDS).
RDS INFO Display
The RDS INFO display function
shows the name ...
Front HFL-Navigation-ANC
Microphone
Removal/Installation
NOTE:
• Put on gloves to protect your hands.
• Take care not to scratch the dashboard and related
parts.
• Lay a workshop towel under the parts when working
on them to protect ...
Auto Door Locking
The auto door locking feature has
three possible settings:
The auto door locking is
deactivated all the time.
The doors lock whenever you
move the shift lever out of the
Park (P) position (A ...