 Honda Accord: Ceiling Light Test/Replacement
1. Turn the celling light switch OFF.
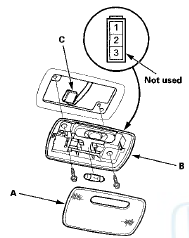
2. Carefully pry the lens (A) off with a small screwdriver.
2. Carefully pry the lens (A) off with a small screwdriver.
Celling Light 8 W

3. Remove the screws, then remove the ceiling light (B).
4. Disconnect the 3P connector (C) from the ceiling light.
5. Check for continuity between the terminals.
• There should be continuity between terminals No. 1 and No. 2 with the switch in the MIDDLE position.
• There should be continuity between terminals No. 2 and No. 3 (body ground) with the switch in the ON position.
• There should be no continuity between terminals No. 1 and No. 2, and between terminals No. 2 and No. 3 (body ground) with the switch in the OFF position.
6. If the continuity is not as specified, check the bulb. If the bulb is OK, replace the ceiling light.
7. Install the light in the reverse order of removal.
 Front Individual Map Light
Test/Replacement
With moonroof
1. Turn the map light switch OFF.
2. Carefully pry the lens ( A ) off with a small screwdriver.
Individual Map Light: 8 W x 2
3 . Remove the screws, then remove the individual ma ...
 Trunk Light Test/Replacement
1. Open the trunk lid.
2. Carefully pry out the trunk light (A).
Trunk Light: 5 W
3. Disconnect the 2P connector (B) from the trunk light.
4. Check for continuity between terminals No. 1 ( + ...
See also:
Door Striker Adjustment
Make sure the door latches securely without slamming
it. If necessary, adjust the striker (A): The striker nuts are
fixed, but the striker can be adjusted slightly up or down,
and in or out.
1. ...
Immobilizer System
The immobilizer system prevents a key that has not been pre-registered from
starting the engine. Each key contains electronic transmitters that use
electronic
signals to verify the key.
Pay att ...
HFL Menus
The power mode must be in ACCESSORY or ON to use HFL.
• Phone Settings screen
1. Press the SETTINGS button.
2. Rotate to select Phone
Settings, then
press .
To use HFL, you must first pa ...
