 Honda Accord: Audio-HVAC Subdisplay Unit
Removal/Installation
Honda Accord: Audio-HVAC Subdisplay Unit
Removal/Installation
With Navigation
NOTE: • Put on gloves to protect your hands.
• Take care not to scratch the dashboard.
1. Remove the dashboard center vent (see page 20-178).
2. Remove the screws, then pull out the audio-HVAC subdisplay unit (A).
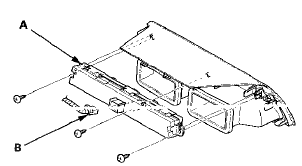
3. Disconnect the connector (B), and remove the audio-HVAC subdisplay unit.
4. Install the audio-HVAC subdisplay unit in the reverse order of removal.
 Audio Disc Changer
Removal/Installation
Audio Disc Changer
Removal/Installation
With Navigation
NOTE:
• Put on gloves to protect your hands.
• Take care not to scratch the dashboard and related
parts.
• Lay a shop towel under the parts when working on
the ...
 Audio-HVAC Display Unit
Removal/Installation
Audio-HVAC Display Unit
Removal/Installation
Without Navigation
NOTE;
• Put on gloves to protect your hands.
• Take care not to scratch the dashboard.
1. Remove the audio unit (see page 23-114) and the
center display visor (se ...
See also:
Canceling Cruise Control
You can cancel cruise control in any
of these ways:
Tap the brake or clutch pedal.
Push the CANCEL button on the
steering wheel.
Push the CRUISE button on the
steering wheel. ...
Brake/Taillight and Rear Turn Signal Light/Rear SideMarker Light Bulbs
When replacing, use the following bulbs.
1. Remove the holding clips using a flat-tip
screwdriver, then pull the lining back.
2. Turn the socket to the left and remove it.
3. Remove the ...
Taillight and Back-Up Light Bulbs
When replacing, use the following bulbs.
1. Remove the holding clips using a flat-tip
screwdriver, then pull the lining back.
2. Turn the socket to the left and remove it.
3. Remove the ol ...