 Honda Accord: Audio Disc Changer
Removal/Installation
Honda Accord: Audio Disc Changer
Removal/Installation
With Navigation
NOTE: • Put on gloves to protect your hands.
• Take care not to scratch the dashboard and related parts.
• Lay a shop towel under the parts when working on them to protect the face panel from scratches or other damage.
• Eject all the discs before remove the audio disc changer unit to prevent damaging the audio disc changer load mechanism.
1. Remove the center console panel (see page 20-157) and the dashboard center pocket (see page 20-168).
2. Remove the bolts (A), then pull out the audio disc changer (6).
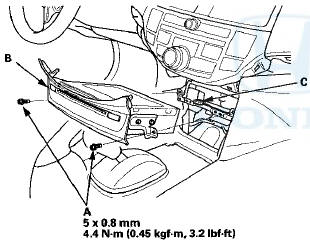
3. Disconnect the connector (C), then remove the audio disc changer.
4. Install the audio disc changer in the reverse order of removal.
 Audio Switch Panel
Removal/Installation
Audio Switch Panel
Removal/Installation
With Navigation
NOTE:
• Put on gloves to protect your hands.
• Take care not to scratch the dashboard and related
parts.
• Lay a workshop towel under the parts when working
on ...
 Audio-HVAC Subdisplay Unit
Removal/Installation
Audio-HVAC Subdisplay Unit
Removal/Installation
With Navigation
NOTE:
• Put on gloves to protect your hands.
• Take care not to scratch the dashboard.
1. Remove the dashboard center vent (see page 20-178).
2. Remove the screws, ...
See also:
XM Antenna Replacement
1. Remove the headliner (see page 20-140).
2. Remove the nut (A) from the XM antenna (B).
3. Disconnect the connector (C) and remove the XM
antenna.
4. Install the XM antenna in the reverse ...
Circuit Diagram
...
Important Maintenance Precautions
If you have the required service
done but do not reset the display, or
reset the display without doing the
service, the system will not show the
correct maintenance intervals. This
can lead ...