 Honda Accord: A/C Compressor Replacement
NOTE: Do not install the A/C compressor into a system unless you are completely sure that the system is free of contamination. Installing the A/C compressor into a contaminated system can result in premature A/C compressor failure.
1. If the A/C compressor is marginally operable, run the engine at idle speed, and let the air conditioning work for a few minutes, then shut the engine off.
2. Recover the refrigerant with a recovery/recycling/charging station (see page 21-80).
3. Remove the drive belt (see page 4-30).
4. Remove the A/C condenser fan shroud (see page 10-13).
5. Disconnect the A/C compressor clutch connector (A).
Remove the bolts and the nut, then disconnect the suction hose (B) and the discharge hose (C) from the A/C compressor. Plug or cap the lines immediately after disconnecting them to avoid moisture and dust contamination.
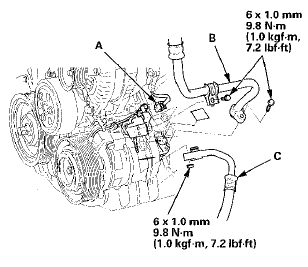
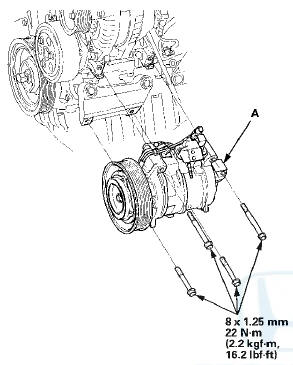
6. Remove the mounting bolts and the A/C compressor (A), Be careful not to damage the radiator fins when removing the compressor.
7. Install the A/C compressor in the reverse order of removal, and note these items: • Inspect the A/C lines for any signs of contamination.
• If you're installing a new A/C compressor, you must calculate the amount of refrigerant oil to be removed from it (see page 21-6). A new A/C compressor comes with a full charge of oil.
• Replace the O-rings with new ones at each fitting, and apply a thin coat of refrigerant oil before installing them. Be sure to use the correct O-rings for HFC-134a (R-134a) to avoid leakage.
• Use only PAG refrigerant oil (DENSO ND-OIL 8) for HFC-134a A/C systems.
• To avoid contamination, do not return the oil to the container once dispensed, and never mix it with other refrigerant oils.
• Immediately after using the oil, reinstall the cap on the container, and seal it to avoid moisture absorption.
• Do not spill the refrigerant oil on the vehicle; it may damage the paint; if the refrigerant oil contacts the paint, wash it off immediately.
• Be careful not to damage the radiator fins when installing the A/C compressor and the A/C condenser fan shroud.
• Charge the system (see page 21-81).
 Heater Unit/Core Replacement
SRS components are located in this area. Review the
SRS component locations (see page 24-21) and the
precautions and procedures (see page 24-25) before
doing repairs or service.
1. Do the batter ...
 A/C Compressor Clutch Check
1. Check the pressure plate for discoloration, peeling, or
other damage. If there is damage, replace the clutch
set (see page 21-75).
2. Check the pulley bearing play and drag by rotating the
pu ...
See also:
Recirculation Control Motor Circuit
Troubleshooting
908-09 models 4-door with A/T and '10 model
with AT
1. Check the No. 16 (7.5 A) fuse in the driver's
under-dash fuse/ relay box.
Is the fuse OK?
YES-Go to step 2.
NO-Replace the fuse, and re ...
Cylinder Head
...
Circuit Diagram
...