
 Honda Accord: 1st, 2nd, and 3rd Clutch Reassembly
Special Tools Required
Clutch Spring Compressor Set 07LAE-PX40000
NOTE: Hold the spring compressor in a vise with soft jaws. Be careful not to damage the clutch drum.
1 Soak the clutch discs thoroughly in ATF for at least 30 minutes.
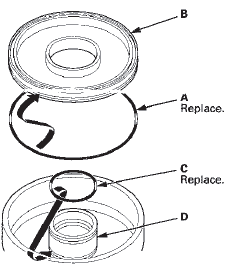
2. Install a new O-ring (A) in the 1st, 2nd, and 3rd clutch pistons (B), and install a new O-ring (C) on the clutch drums (D).
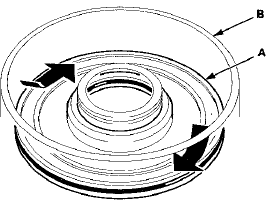
3. Install the clutch piston (A) in the clutch drum (B).
Apply pressure and rotate to ensure proper seating.
Lubricate the piston O-ring with ATF before installing Do not pinch the O-ring by installing the piston with too much force.
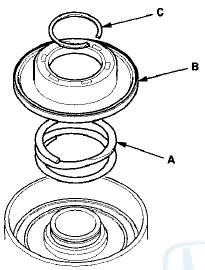
4. Set the return spring (A) and the spring retainer (B) on the clutch piston, and position the snap ring (C) on the spring retainer.
5. Install the clutch spring compressor.
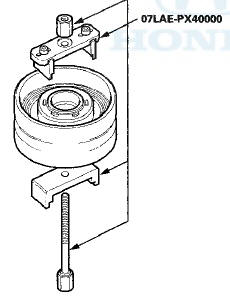
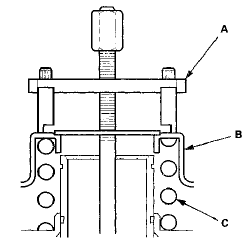
6. Set the clutch spring compressor (A) on the spring retainer (B) so that it compresses the clutch return spring (C).
NOTE: Coat the circumference of the spring retainer and areas where the spring retainer contacts the clutch piston with ATF before installation.
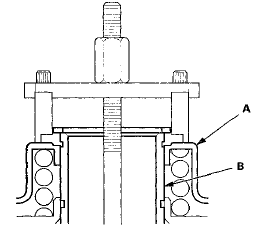
. Compress the return spring carefully until the snap ring can be installed. Check that the spring retainer (A) is properly installed on the clutch hub (B). If improperly installed, change the position of the spring compressor and the spring retainer.
NOTE: Insert the spring retainer so it can be adjusted (center of tolerance) to prevent damaging the spring retainer oil seal.
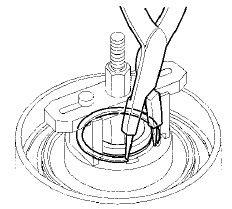
8. Install the snap ring using snap ring pliers.
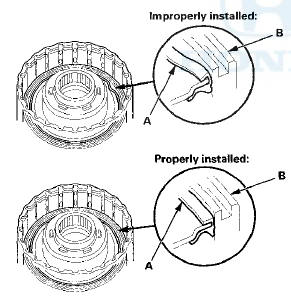
9. Remove the clutch spring compressor, 10. Make sure the oil seal of the spring retainer (A) is properly installed on the clutch piston (B). If the oil seal was damaged or cracked, replace the spring retainer.
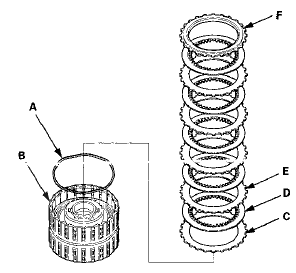
11. Install the wave spring (A) in the 1 st clutch drum (B).
Install the clutch flat-plate (C), then starting with the clutch disc, alternately install the clutch discs (D) (5) and the wave-plates (E) (4). Install the clutch end-plate (F) with the flat side toward the top disc.
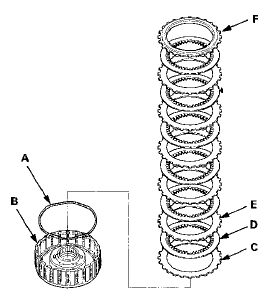
12. Install the wave spring (A) in the 2nd clutch drum (B).
Install the clutch flat-plate (C), then starting with the clutch disc, alternately install the clutch discs (D) (6) and the wave-plates (E) (5). Install the clutch end-plate (F) with the flat side toward the top disc.
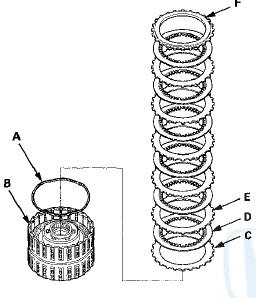
13. Install the wave spring (A) in the 3rd clutch drum (B).
Install the clutch flat-plate (C), then starting with the clutch disc, alternately install the clutch discs (D) (6) and the wave-plates (E) (5). Install the clutch end-plate (F) with the flat side toward the top disc.
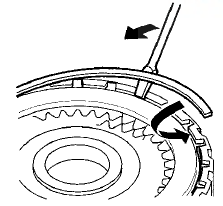
14. Install the snap ring using a screwdriver to secure the clutch end-plate.
15. Check that the clutch piston moves by applying air pressure into fluid passage.
 Clutch Clearance Inspection
Special Tools Required
Clutch Compressor Attachment 07ZAE-PRP0100
1. Inspect the clutch piston, the clutch discs, the clutch
plates, and the clutch end-plate for wear and damage
(see page 14-303), ...
 4th and 5th Clutch Reassembly
Special Tools Required
Clutch Spring Compressor Set 07LAE PX40000
1. Soak the clutch discs thoroughly in ATF for at least
30 minutes.
2. Install new O-rings (A) on the clutch piston (B). Do not
...
See also:
Fuel Line Inspection
Check the fuel system lines and hoses for damage, leaks, and deteriorationi,.
Replace any damaged parts.
Check all clamps, and make sure they are properly positioned and tightened.
All models ex ...
Transmitter Test
NOTE:
• If the doors unlock or lock with the
transmitter, but the
LED on the transmitter does not come on, the LED is
faulty; replace the transmitter.
• If any door is open, you cann ...
To Change Tracks
Each time you press and release the
side of the skip bar or push the
interface selector to the right, the
player skips forward to the
beginning of the next track. Press
and release the sid ...