 Honda Accord: Trim Remowal/Installatlon - Rear Side Area
Special Tools Required
KTC Trim Tool Set SOJATP2014*
*Available through the Honda Tool and Equipment Program; call 888-424-6857
2-door
SRS components are located in this area. Review the SRS component locations {see page 24-23) and the precautions and procedures (see page 24-25) before doing repairs or service.
NOTE: - Put on gloves to protect your hands.
- Take care not to bend or scratch the trim or the panels.
- Use the appropriate tool from the KTC trim tool set to avoid damage when removing components.
1. Remove these items: - Door sill trim (see page 20-105) - C-pillar trim (see page 20-123) - Rear seat-back (see page 20-239) - Rear seat cushion (see page 20-241) 2. Lower the rear seat pivot bracket (A).
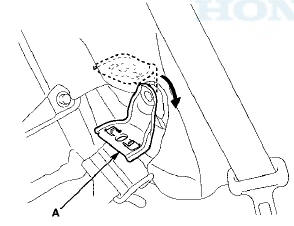
3. Remove the rear side trim panel (A).
-1. Detach the clip (B).
-2. Gently pull back the rear shelf (C) to release the projections (D) and the hook (E) from the panel.
-3. Detach the clips (F) by pulling back the panel.
-4. Release the hooks (G) and the tabs (H) from the B-pillar upper trim (I).
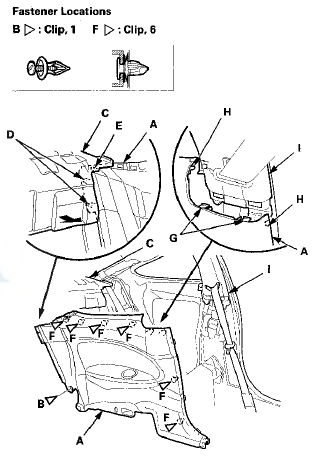
4. Install the panel in the reverse order of removal, and note these items: - If the clips are damaged or stress-whitened, replace them with new ones.
- Push the clips, the hooks, and the tabs into place securely.
 Trim Removal/Installation - Pillar
Areas
Trim Removal/Installation - Pillar
Areas
Special Tools Required
KTC Trim Tool Set SOJATP2014*
*Available through the Honda Tool and
Equipment
Program; call 888-424-6857
A-Pillar Trim
SRS components are located in this area. Review the ...
 Trim Removal/Installation - Rear Shelf Area
Special Tools Required
KTC Trim Tool Set SOJATP2014*
*Available through the Honda Tool and
Equipment
Program; call 888-424-6857
Rear Shelf
SRS components are located in this area. Review the
S ...
See also:
General Troubleshooting Information
System Indicator
The TPMS (tire pressure monitoring system) has the low
tire pressure indicator and the TPMS indicator.
The Low Tire Pressure Indicator
- If the system detects low pressure in an ...
Throttle Body Cleaning
Do n o t i n s e r t : your fingers into the installed throve
body when you turn the ignition switch to ON (II) or
while the ignition switch is in ON (II). If you do, you
will seriously injure your ...
Adjusting the Sound
Press the MENU button to display
the sound settings. Turn the selector
knob to select an appropriate setting:
bass, treble, fader, balance, SUBW*
(subwoofer) and SVC (speedsensitive
volume ...