 Honda Accord: Throttle Body Cleaning
Do n o t i n s e r t : your fingers into the installed throve body when you turn the ignition switch to ON (II) or while the ignition switch is in ON (II). If you do, you will seriously injure your fingers if the throttle valve is activated.
1. Check for damage to the air cleaner element. If the air cleaner element is damaged, replace it (see page 11-333).
2. Remove the throttle body (see page 11-335).
3. Clean off the carbon from the throttle valve and inside the throttle body with a paper towel soaked in throttle plate cleaner.
NOTE: - Remove the throttle body to clean it.
- Be careful not to pinch your fingers.
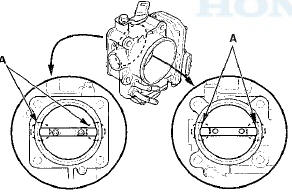
- To avoid removing the molybdenum coating, do not clean the bearing area of the throttle shaft (A).
- Do not spray throttle plate cleaner directly on the throttle body.
- Use Honda genuine throttle plate cleaner.
4. Install the throttle body (see page 11-335).
5. Reset the ECM/PCM with the HDS (see page 11-4).
6. Turn the ignition switch to ON (II), and wait 2 seconds.
7. Do the ECM/PCM idle learn procedure (see page 11-293).
 Throttle Body Test
Carbon Accumulation Check
NOTE: If the malfunction indicator lamp (MIL) has been
reported on, check for diagnostic trouble codes (DTCs).
1. Connect the HDS to the data link connector (DLC) (A)
l ...
 Air Cleaner Removal/Installation
1. Disconnect the MAF sensor/IAT sensor connector (A).
2. Remove the harness clamps (B) and the bolts (C).
3. Loosen the band (D), then remove the air cleaner
housing (E).
4. Install the par ...
See also:
Door Key Cylinder Switch Test
1. Remove the driver's door panel (see page 20-17).
2. Disconnect the 10P connector (A) from the door lock
actuator (key cylinder switch) (B).
3. Check for continuity between the terminals.
...
ATF Replacement
NOTE: Keep all foreign particles out of the transmission.
1. Park the vehicle on level ground.
2. Warm up the engine to normal operating temperature
(the radiator fan comes on), and turn the en ...
Knuckle/Hub Bearing Unit Replacement
Exploded View
Special Tools Required
- Ball Joint Thread Protector, 14 mm
07AAE-SJAA100
- Ball Joint Remover, 32 mm 07MAC-SL0A102
Hub Bearing Unit Replacement
1. Raise and support the vehicle ...