 Honda Accord: Rear Seats
• Folding Down the Rear Seat
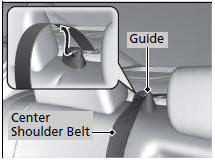
1. Remove the center shoulder belt from the guide.
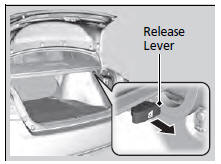
2. Pull the release lever in the trunk to release the lock.
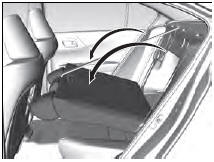
3. Fold the seat-back down.
If the rear head restraints get caught on the front seat-backs, remove the head restraints.
The rear seat-back can be folded down to accommodate bulkier items in the trunk.
Never drive with the seat-back folded down and the trunk lid open.
To lock the seat-back upright, push it backwards until it locks.
When returning a seat-back to its original position, push it firmly back. Also, make sure all rear shoulder belts are positioned in front of the seat-back, and the center shoulder belt is re-positioned in the guide.
Make sure that the folded seat-back does not press against the front passenger seat, as this can cause the weight sensors in the front passenger seat to work improperly.
Also make sure all items in the trunk or items extending through the opening into the rear seat is properly secured. Loose items can fly forward if you have to brake hard.
The front seat(s) must be far enough forward so they do not interfere with the rear seats as they fold down.
 Adjusting the Seat Positions
Adjust the driver's seat as far back as possible
while allowing you to maintain full control of
the vehicle. You should be able to sit upright,
well back in the seat and be able to
adequatel ...
 Armrest
• Using the Rear Seat Armrest
Pull down the armrest in the center seat-back. ...
See also:
Lane Departure Warning (LDW)*
Alerts you when the system detects a possibility of your vehicle
unintentionally
crossing over left or right side lane markings.
• How the System Works
If your vehicle is getting too close t ...
Circuit Diagram
...
Driveshaft Inspection
1. Check the inboard boot (A) and the outboard boot (B)
on the driveshaft (C) for cracks, damage, leaking
grease, and loose boot bands (D). If any damage is
found, replace the boot and the boot ban ...