 Honda Accord: Moonroof Control Unit input Test
NOTE; If the moonroof works OK manually, but will not work in AUTO, or reverses frequently (obstacle detection), reset the moonroof (see page 22-371) before proceeding with the input test 1. Turn the ignition switch to LOCK (0).
2. Remove the headliner (see page 20-140).
3. Disconnect the 14P connector (A) from the moonroof control unit/motor (B).

4. Inspect the connector and socket terminals to be sure they are all making good contact.
• If the terminals are bent, loose or corroded, repair them as necessary, and recheck the system.
• If the terminals look OK, go to step 5.
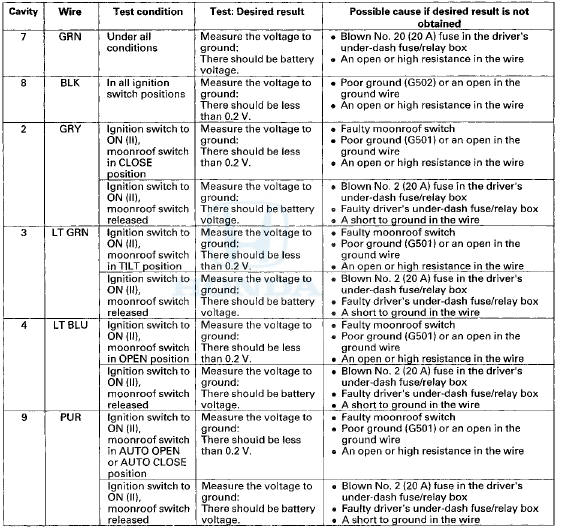
5. With the connector still disconnected/do these input tests at the following connector.
• If any test indicates a problem, find and correct the cause, then recheck the system.
• If all the input tests prove O K , go to step 6.
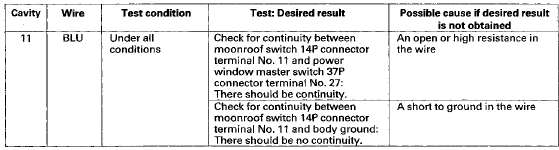
6. Reconnect the connector to the control unit and do these input tests at the following connector.
• If any test indicates a problem, find and correct the cause, then recheck the system.
• If all the input tests prove OK, go to step 7.
7. If all the input tests are OK and multiple failures are found, replace the moonroof control unit/motor assembly (see page 20-96). If the problem is related to the key-off operation, go to the driver's MICU input test (see page 22-176), and passenger's MICU input test (see page 22-180).
 Circuit Diagram
...
 Moonroof Switch Test/Replacement
1. Remove the front Individual map lights (see page
22-258).
2. Disconnect the moonroof switch 12P connector (A)
and map light 3P connector (B).
3. Remove the moonroof switch (C) from the map ...
See also:
Shift Lock Solenoid Replacement
Type A Shift Lever
1. Remove the shift lever assembly (see page 14-222).
2. Release the lock tabs (A) retaining the shift lock
solenoid using thin-bladed screwdrivers.
3. Insert a 6.0 mm (0.24 ...
Accessories
When installing accessories, check the following:
• Do not install accessories on the windshield. They can obstruct your view
and
delay your reaction to driving conditions.
• Do not install ...
Checking the Engine
If the engine does not start, check the starter.
If you must start the vehicle immediately, use an
assisting vehicle to jump start it.
...