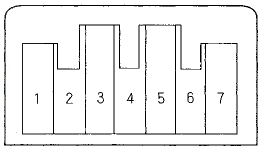
 Honda Accord: Mode Control Motor Test
NOTE: Before testing the motor, check for HVAC DTCs (see page 21-101).
1. Disconnect the 7P connector from the mode control motor.

Incorrectly applying power and ground to the mode control motor will damage it Follow the instructions carefully.
2. Connect battery power to terminal No. 1 of the mode control motor, and ground terminal No. 2;the mode control motor should run, and stop at Defrost. If it doesn't, reverse the connections; the mode control motor should run, and stop at Vent When the mode control motor stops running, disconnect battery power immediately.
MODE CONTROL MOTOR

3. If the mode control motor did not run in step 2, remove it, then check the mode control linkage and door for smooth movement.
• If the linkage and door move smoothly, replace the mode control motor (see page 21-62).
• If the linkage or door sticks or binds, repair them as needed.
• If the mode control motor runs smoothly, go to step 4.
4. Measure the resistance between terminals No. 5 and No. 7 of the mode control motor. It should be between 4.2 and 7.8 kO.
5. Reconnect the mode control motor 7P connector, then turn the ignition switch to ON (II).
6. Using the backprobe set, measure the voltage between terminals No. 3 and No. 7 of the 7P connector.
Vent: About 0.5 V
Defrost: About 4.5 V
7. If either the resistance or the voltage readings are not as specified, replace the mode control motor (see page 21-62).
 Passenger's Air Mix Control Motor
Replacement
1. Remove the glove box (see page 20-174).
2, Disconnect the 4P connector (A) from the power
transistor (B), and the 7P connector (C) from the
passenger's air mix control motor (D). Remove the
s ...
 Recirculation Control Motor Test
NOTE: Before testing the motor, check for HVAC DTCs
(see page 21-101).
1. Disconnect the 7P connector from the recirculation
control motor.
Incorrectly applying power and ground to the
recirc ...
See also:
Parking Brake Cable Replacement
Exploded View
NOTE:
- The parking brake cables must not be bent or
distorted. This will lead to stiff operation and
premature cable failure.
- Refer to the Exploded View as needed during this ...
Clutch Wave-plate Phase Difference
Inspection
1. Place the clutch wave-plate (A) on a surface plate, and
set a dial indicator (B) on the wave-plate.
2. Find the bottom (C) of a phase difference of the
wave-plate, zero the dial indicator an ...
Circuit Diagram
...
