 Honda Accord: Injector Replacement
1. Relieve the fuel pressure (see page 11-306).
2. Remove the engine cover, 3. Disconnect the quick-connect fitting (A).
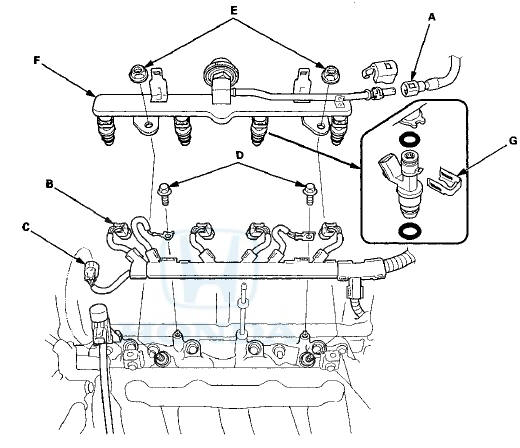
4. Disconnect the Injector connectors (B) and the engine mount control solenoid valve connector (C).
5. Remove the ground cable bolts (G101 and G102) (D).
6. Remove the fuel rail mounting nuts (E) from the fuel rail (F).
7. Remove the fuel rail and the Injectors from the Injector base.
8. Remove the Injector clips (G) from the fuel rail 9. Remove the injectors from the fuel rail.
10. Coat the new 0-rings (black) (A) with clean engine oil, and insert the injectors (B) into the fuel rail (C).
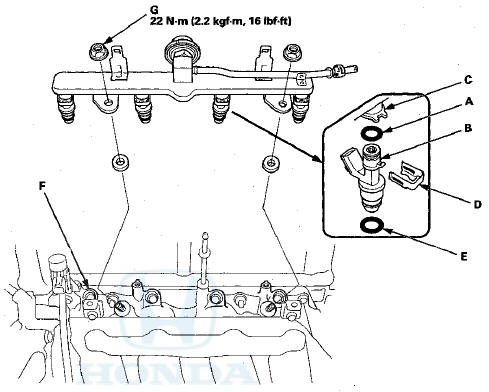
11. Install the injector clips (D).
12. Coat the new injector O-rings (brown) (E) with clean engine oil.
13. Install the fuel rail and the injectors in the injector base (F).
14. Install the fuel rail mounting nuts (G) and the ground cable bolts (G101 and G102).
15. Connect the injector connectors and the engine mount control solenoid valve connector.
16. Connect the quick-connect fitting.
17. Turn the ignition switch to ON (II), but do not operate the starter. After the fuel pump runs for about 2 seconds, the fuel rail will be pressurized. Repeat this two or three times, then make sure there are no fuel leaks.
18. Reinstall the engine cover.
 DLC Circuit Troubleshooting
NOTE: If you suspect the HDS or the HDS DLC cable may
be the source of the communication probrem, verify that
they are working properly by connecting them to a
known-good, like vehicle and system, ...
 A/F Sensor Replacement
Special Tools Required
02 Sensor Wrench Snap-on S6176 or equivalent,
commercially available
1. Disconnect the A/F sensor 4P connector (A), then
remove the A/F sensor (B).
2. Install the parts i ...
See also:
Clutch Clearance Inspection
Special Tools Required
Clutch Compressor Attachment 07ZAE-PRP0100
1. Inspect the clutch piston, the clutch discs, the clutch
plates, and the clutch end-plate for wear and damage
(see page 14-303), ...
Component Location Index
With navigation system
Without navigation system
...
Front Seat Belt Replacement
Front Seat Belt - 2-door
SRS components are located in this area. Review the
SRS component locations (see page 24-23) and the
precautions and procedures (see page 24-25) before
doing repairs or se ...