 Honda Accord: Horn Switch Test
NOTE: Check for a blown No. 10 (20 A) fuse in the under-hood fuse/relay box. If it is blown, check for a faulty horn relay.
1. Turn the steering wheel 180 degrees from the center position and remove the cover (A).

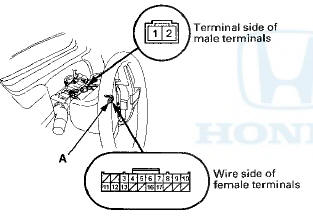
Wire side of female terminals
2. Disconnect the horn switch 2P connector (B).
3. Connect horn switch 2P connector terminals No. 1 and No. 2 with a jumper wire. The horns should sound.
• If the horns sound, check or adjust the installation of the driver's airbag assembly and the horn switch plate.
• If the horns don't sound, go to step 4.
4. Remove the jumper wire from the horn switch 2P connector.
5. Remove the steering column covers (see page 20-181).
6. Remove the driver's airbag assembly (see page 24-211).
7. Disconnect cable reel subharness 2 0 P connector (A).
8. Connect cable reel subharness 20P connector (A) terminals No. 11 and No. 12 with a jumper wire. The horns should sound.
• If the horns sound, replace the cable reel subharness.
• If the horns don't sound, go to step 9.
9. Disconnect the dashboard wire harness 20P connector (A).
10. Connect dashboard wire harness 20P connector terminals No. 1 and No. 2 with a jumper wire. The horns should sound.
• If the horns sound, replace the cable reel.
• If the horns don't sound, repair an open in terminal No. 2 or No. 1 wire, or a faulty driver's MICU.
 Horn Test/Replacement
1. Remove the grille cover;
•2-door (see page 20-274)
• 4-door (see page 20-274)
2. Disconnect the 1P connector (A) from each horn (B).
3. Test the horn by momentarily connecting L _.t ...
 Exterior Lights
...
See also:
Brake Fluid Level Switch Test
NOTE: If both the ABSA/SA indicator and the brake
system indicator come on at the same time, check the
VSA system for DTCs first (see page 19-48).
1. Disconnect the brake fluid level switch conne ...
Audio/Information Screen
Displays the audio status and wallpaper. From this screen, you can go to
various
setup options.
• Switching the Display
Press the (display) button to
change the display.
• Audio
Shows ...
A/C Compressor Clutch Check
1. Check the pressure plate for discoloration, peeling, or
other damage. If there is damage, replace the clutch
set (see page 21-75).
2. Check the pulley bearing play and drag by rotating the
pu ...