 Honda Accord: Hood Opener Cable Replacement
NOTE: - Put on gloves to protect your hands.
- Take care not to scratch the body or the related parts.
- Take care not to kink the hood opener cable.
1. Remove these items: - Front grille cover: - 2-door (see page 20-274) - 4-door (see page 20-274) - Front fender trim, left side: - 2-door (see page 20-277) - 4-door (see page 20-277) - Front inner fender, left side as needed (see page 20-290) - Kick panel, driver's side: - 2-door (see page 20-105) - 4-door (see page 20-107) 2. Disconnect the hood opener cable (A) from the hood latch (B) (see page 20-302).
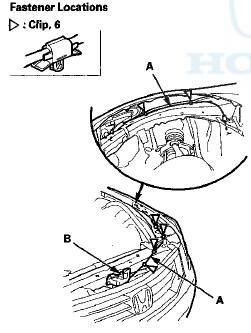
3. Detach the clips with a clip remover.
4. Disconnect the hood opener cable (A) from the hood release handle (B) (see page 20-303).
5. Remove the grommet (C), then remove the hood opener cable.
6. Install the cable in the reverse order of removal, and note these items: - If the clips are damaged or stress-whitened, replace them with new ones.
- When installing the opener cable under the dashboard, route the cable under the left engine compartment wire harness (D).

 Trunk Lid Opener Cable/Fuel Fill Door
Opener Cable Replacement
Trunk Lid Opener Cable/Fuel Fill Door
Opener Cable Replacement
SRS components are located in this area. Review the
SRS component locations, 2-door (see page 24-23),
4-door (see page 24-21) and the precautions and
procedures (see page 24-25) before doing repair ...
See also:
Front Bumper Fog Light Cover
Replacement
2-door
NOTE; Take care not to scratch the front bumper.
1. Remove the front bumper (see page 20-255).
2. Remove the screws (A, B), then remove the front
bumper fog light cover (C) from the fro ...
Front Airbags (SRS)
The front SRS airbags inflate in a moderate-to-severe frontal collision to
help protect
the head and chest of the driver and/or front passenger.
SRS (Supplemental Restraint System) indicates that ...