 Honda Accord: Function Test
NOTE: The right power mirror is controlled by the front passenger's power w i n d o w s w i t c h . W h e n t h e power mirror s w i t c h is o p e r a t e d , t h e d o o r m u l t i p l e x c o n t r o l unit receives t h e signals f r om t h e power m i r r o r s w i t c h and sends t h e signals t o t h e f r o n t passenger's power window switch. If there is malfunction of the right power mirror actuator operation, do the door multiplex control unit input test (see page 22-391) and front passenger's power window switch input test (see page 22-394).
Left Power Mirror Function Test
1. Remove the power window master switch.
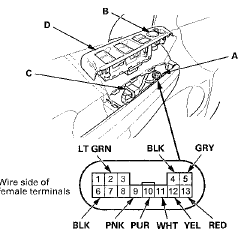
• 4-door (see page 22-305) • 2-door (see page 22-306) 2. Disconnect the 13P connector (A) from the power mirror switch ( B ) and 37P connector (C) from the power window master switch'(D).
NOTE: The illustration shows 4-door.

3. Turn the ignition switch to ON (II).
4. Measure the voltage between body ground and terminal No. 2 of the power mirror switch 13P connector with the ignition switch ON (II). There should be battery voltage.
• If there is no battery voltage, check for: - Blown No. 16 (7.5 A) fuse in the driver's under-dash fuse/relay box.
- An open in the LT GRN wire.
• If there is battery voltage, go to step 5.
5. Check for continuity between terminal No. 6 and body ground. There should be continuity.
• If there is no continuity, check for: - An open in the BLK wire.
- Poor ground (G501).
• If there is continuity, go to step 6.
6. Connect terminals No. 2 and No. 10, and terminals No. 5 (or No. 12) and No. 6 with jumper wires. The left mirror should tilt down (or swing left) with the ignition switch in ON (II).
• If the left mirror does not tilt down (or does not swing left), check for an open in the GRY (or YEL) wire between the left mirror and the 13P connector.
If the wire is OK, check the left mirror actuator.
• If the mirror neither tilts down nor swings left, repair the PUR wire.
• If the mirror works properly, check the mirror switch.
 Circuit Diagram
With navigation system
Without navigation system
...
 Power Window Master Switch Input
Test
NOTE: Before testing, troubleshoot the multiplex Integrated control unit
first, using B-CAN System Diagnosis Test Mode
A (see page 22-134).
1. Turn the ignition switch to LOCK (0), open and clos ...
See also:
Setting the Clock
Clock
You can adjust the time in the clock display with the ignition switch is in
ON
The clock is automatically updated through the
navigation system, so the time does not need to be
adju ...
DTC Troubleshooting
DTC B1127: Driver's Door Key Cylinder Switch
Malfunction
NOTE: If you are troubleshooting multiple DTCs, be sure
to follow the instructions in B-CAN System Diagnosis
Test Mode A (see page 22-134). ...
Circuit Diagram
...
