 Honda Accord: Front Passenger's Power Window
Switch input Test
Honda Accord: Front Passenger's Power Window
Switch input Test
1. Turn the ignition switch to LOCK (0), open and close the driver's door, then remove the front passenger's (passenger's) power window switch.
- • 4-door (see page 22-306) • 2-door (see page 22-307) 2. Disconnect the 37P connector (A) from the front passenger's (passenger's) power window switch (B).
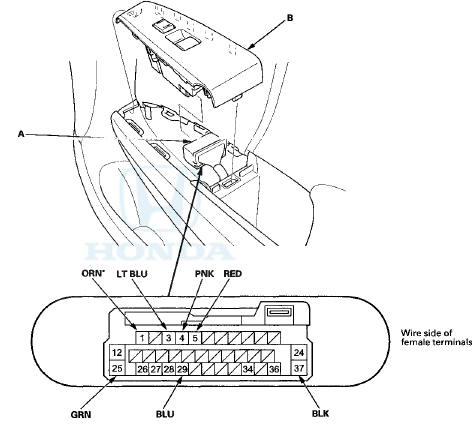
*: With mirror defogger
3. Inspect the connector and socket terminals to be sure they are all making good contact.
• If the terminals are bent, loose, or corroded, repair them as necessary, and recheck the system.
• If the terminals look OK, go to step 4.
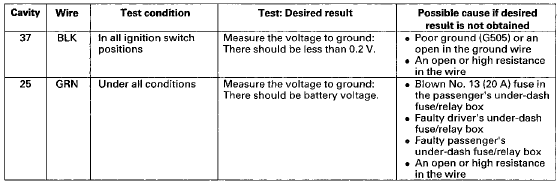
4. Reconnect the connector to the front passenger's power window switch/turn the ignition switch to ON (11), and do these input tests at the following connector.
• If any test indicates a problem, find and correct the cause, then recheck the system.
• If all the input tests prove OK, go to step 5.
5. Turn the ignition switch to LOCK (0), open and close the driver's door, then disconnect the 37P connector from the front passenger's power window switch again.
6. With the connector still disconnected, do these input tests at the following connector.
• If any test indicates a problem, find and correct the cause, then recheck the system.
• If all the input tests prove OK, replace the front passenger's power window switch, and go to step 7.
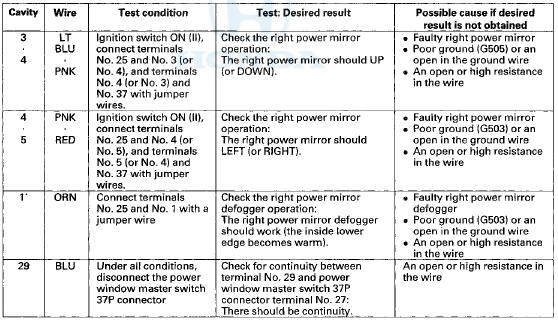
*: With mirror defogger
7. With the front passenger's power window AUTO UP/AUTO DOWN function, reset the power window control unit (see page 22-280).
 Power Window Master Switch Input
Test
Power Window Master Switch Input
Test
NOTE: Before testing, troubleshoot the multiplex Integrated control unit
first, using B-CAN System Diagnosis Test Mode
A (see page 22-134).
1. Turn the ignition switch to LOCK (0), open and clos ...
 Power Mirror Switch
Test/Replacement
Power Mirror Switch
Test/Replacement
1. Remove the power window master switch.
• 4-door (see page 22-305)
• 2-door (see page 22-306)
2. Disconnect the 13P connector from the power mirror
switch (A).
3. Check for contin ...
See also:
Front Door Outer Molding
Replacement
Special Tools Required
KTC Trim Tool Set SOJATP2014*
*Available through the Honda Tool and
Equipment
Program; call 888-424-6857
NOTE:
- If you remove the door outer molding, replace it with a
...
Frame and Drain Tube Replacement
SRS components are located in this area. Review the
SRS component locations, 2-door (see page 24-23),
4-door (see page 24-21) and the precautions and
procedures (see page 24-25) before doing repair ...
Folder Scan
This feature, when activated,
samples the first file in each folder
for 10 seconds. To scan a folder,
press the SCAN side of the SCAN/
A. SEL bar repeatedly. You will see
SCAN next to FOLDER ...