 Honda Accord: Front Door Sash Inner Trim
Replacement
Honda Accord: Front Door Sash Inner Trim
Replacement
2-door
NOTE: Take care not to scratch the door.
1. Remove the door panel (see page 20-12).
2. Lower the glass fully.
3. Remove the door sash inner trim (A).
-1. Detach the clip fastening the trim.
-2. Pull back along the outside edge of the trim to release the hook strip (B) from the door glass opening flange at the A-pillar area and the roof area of the door sash.
-3. Release the hook (C) from the glass run channel (D) at the rear corner area of the door sash.
-4. Pull back along the outside edge of the trim to release the hook strip (E) from the door glass , opening flange at the B-pillar area of the door sash.
-5. Release the rear hook (F) from the door.
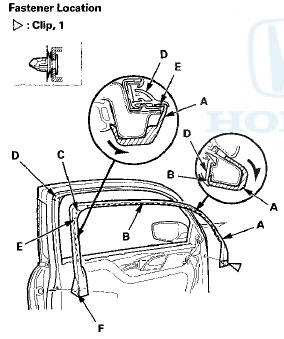
4. Install the trim in the reverse order of removal, and note these items: - If the clip is damaged or stress-whitened, replace it with a new one.
- Push the clip, the hooks, and the hook strip into place securely.
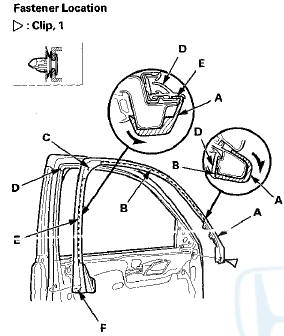
4-door
NOTE: Take care not to scratch the door.
1. Remove the door panel (see page 20-17).
2. Lower the glass fully.
3. Remove the door sash inner trim (A).
-1. Detach the clip fastening the trim.
-2. Pull back along the outside edge of the trim to release the hooks or the hook strips (B) from the door glass opening flange at the A-pillar area and the roof area of the door sash.
-3. Release the hook (C) from the glass run channel (D) at the rear corner area of the door sash.
-4. Pull back along the outside edge of the trim to release the hooks or the hook strips (E) from the door glass opening flange at the B-pillar area of the door sash.
-5. Release the rear hook (F) from the door.
Japan-produced models
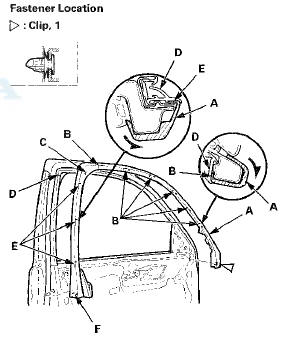
USA-produced models
4. Install the trim in the reverse order of removal, and note these items: - If the clip is damaged or stress-whitened, replace it with a new one.
- Push the clip, the hooks, and the hook strips into place securely.
 Front Door Glass and Regulator
Replacement
Front Door Glass and Regulator
Replacement
NOTE: Put on gloves to protect your hands.
1. Remove the door panel:
- 2-door (see page 20-12)
- 4-door {see page 20-17)
2.2-door: Remove the screws, then remove the door
panel bracket (A).
...
 Front Door Sash Outer Trim
Replacement
Front Door Sash Outer Trim
Replacement
NOTE:
- Take care not to scratch the door.
- 4-door is shown; 2-door is similar.
1. Remove the door outer molding (see page 20-36).
2. Pull up the door sash outer trim (A) to release the
ho ...
See also:
Differential Carrier and Final Driven
Gear Replacement
1. Remove the final driven gear (A) from the differential
carrier (B).
NOTE: Differential carrier bolts have left-hand
threads.
2. Install the final driven gear in the direction shown on
the ...
Synchro Ring and Gear Inspection
1. Inspect the synchro rings for scoring, cracks, and
damage (A).
Example of synchro ring teeth
2. Inspect the inside of each synchro ring (B) for wear.
Inspect the ...
DTC Troubleshooting
DTC U0155: Immobilizer-keyless Control Unit
Lost Communication With Gauge Control
Module
NOTE: If you are troubleshooting multiple DTCs, be sure
to follow the instructions in B-CAN System Diagnosi ...