 Honda Accord: ECM/PCM Replacement
Special Tools Required
- Honda diagnostic system (HDS) tablet tester
- Honda Interface Module (HIM) and an iN workstation with the latest HDS software version
- HDS pocket tester
- GNA600 and an iN workstation with the latest HDS software version
Any one of above updating tools can be used.
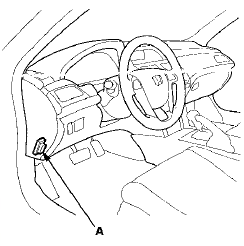
1. Connect the HDS to the data link connector (DLC) (A) located under the driver's side of the dashboard.
2. Turn the ignition switch to ON (II).
3. Make sure the HDS communicates with the ECM/PCM and other vehicle systems. If it doesn't, go to the DLC circuit troubleshooting (see page 11-181). If you are returning from the DLC circuit troubleshooting, skip steps 4 through 9,20 through 25, and 28 through 30, and do this after replacing the ECM/PCM: - Replace the engine oil (see page 8-10) and the engine oil filter (see page 8-12).
- Replace the ATF (A/T model) (see page 14-192).
- Clean the throttle body (see page 11-332).
4. Select the PGM-FI system with the HDS.
5. Select the INSPECTION MENU with the HDS.
6. Select the ETCS TEST, then select the TP POSITION CHECK, and follow the screen prompts.
NOTE: If the TP POSITION CHECK indicates FAILED, continue with this procedure.
7. Select the REPLACE ECM/PCM MENU, then READ DATA, and follow the screen prompts.
NOTE: - Doing this step copies (READS) the engine oil life data from the original ECM/PCM so you can later download (WRITES) it into the new ECM/PCM.
- If READ DATA indicates FAILED, continue with this procedure.
8. A/T models: Select the A/T system with the HDS.
9. A/T models: Select the REPLACE TCM/PCM MENU, then select READ DATA, and follow the screen prompts.
NOTE: - Doing this step copies (READS) the ATF life data from the original PCM so you can later download (WRITES) it into the new PCM.
- If READ DATA indicates FAILED, continue with this procedure.
10. Turn the ignition switch to LOCK (0).
11. Jump the SCS line with the HDS.
12. Do the battery removal procedure (see page 22-92).
13. Remove the bolts (D).
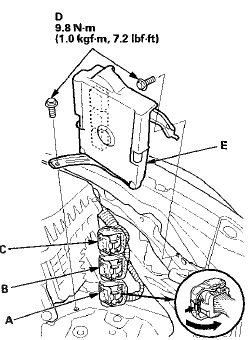
14. Disconnect ECM/PCM connectors A, B, and C, then remove the ECM/PCM assembly (E).
NOTE: ECM/PCM connectors A, B, and C have
symbols (A= , B=
, B= ,
,
C= ) embossed on them for
identification.
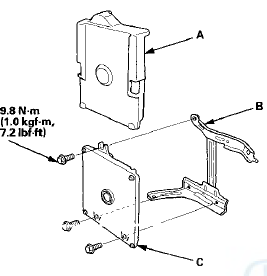
15. Remove the cover (A) and the bracket (B) from the ECM/PCM (C).
16. Install the ECM/PCM in the reverse order of removal.
17. Do the battery installation procedure (see page 22-92).
18. Turn the ignition switch to ON (II).
19. Manually input the VIN to the ECM/PCM with the HDS.
NOTE: DTC P0630 VIN Not Programmed or Mismatch may be stored because the VIN has not been programmed into the ECM/PCM; ignore it, and continue this procedure.
20. If the READ DATA (engine oil life) failed in step 7, go to step 23 (A/T model) or step 26 (M/T model).
Otherwise, go to step 21.
21. Select the PGM-FI system with the HDS.
22. Select the REPLACE ECM/PCM MENU, then select WRITE DATA, and follow the screen prompts.
NOTE: If the WRITE DATA indicates FAILED, continue with this procedure.
23. A/T models: If the READ DATA (ATF life) failed in step 9, go to step 26. Otherwise go to step 24.
24. A/T models: Select the A/T SYSTEM with the HDS.
25. A/T models: Select the REPLACE TCM/PCM MENU, then select WRITE DATA, and follow the screen prompts.
NOTE: If the WRITE DATA indicates FAILED, continue with this procedure.
26. Select IMMOBI system with the HDS.
27. Enter the immobilizer ECM/PCM code that you got from the iN, and usethe ECM/PCM replacement procedure in the IMMOBI MENU of the HDS; it allows you to start the engine.
28. If the TP POSITION CHECK fmmd In step 6 clean the throttle body (see page 11-332), then go to step 29.
29. If the READ DATA failed in step 7 or the WRITE DATA failed in step 22, replace the engine oil (see page 8-10) and engine oil filter (see page 8-12), then go to step 30 (A/T model) or step 31 (M/T model).
30. If the READ DATA failed in step 9 or the WRITE DATA failed in step 25, replace the ATF (see page 14-192), then goto step31.
31. Select PGM-FI system, and reset the ECM/PCM with the HDS.
32. Update the ECM/PCM if it does not have the latest software (see page 11-203).
33. Do the ECM/PCM idle learn procedure (see page 11-293).
34. Do the CKP pattern clear/CKP pattern learn procedure (see page 11-5).
 ECM/PCM Update
Special Tools Required
- Honda diagnostic system (HDS) tablet tester
- Honda Interface Module (HIM) and an iN workstation
with the latest HDS software version
- HDS pocket tester ...

See also:
Tire Rotation
To help increase tire life and
distribute wear more evenly, rotate
the tires according to the
maintenance messages displayed on
the information display.
Move the tires to the positions
sh ...
Engine Coolant
This coolant is premixed with 50% antifreeze and 50% water. Do not add any
straight antifreeze or water.
We recommend you check the engine coolant level every time you refuel. Check
the
reser ...
A/T Clutch Pressure Control Solenoid
Valve B and C Replacement
1. Do the battery removal procedure (see page 22-92).
2. Remove the battery base (see step 8 on page 5-3).
3. Disconnect the A/T clutch pressure control solenoid
valves B and C connectors.
4 ...