
 Honda Accord: DTC Troubleshooting
DTC B1280:
Turn Signal Switch Circuit Malfunction
NOTE: If you are troubleshooting multiple DTCs, be sure to follow the instructions in B-CAN System Diagnosis Test Mode A (see page 22-134).
1. Clear the DTCs with the HDS.
2. Turn the ignition switch to LOCK (0) and then back to ON (II).
3. Operate the turn signal switch in left and right positions, and wait for at least 6 seconds.
4. Check for DTCs with the HDS.
Is DTC B1280 indicated? YES
-Go to step 5, NO
-lntermittent failure, the system is OK at this time.
Check for loose or poor connections.
5. Select LIGHTING fromthe BODY ELECTRICAL system select menu, then enter the DATA LIST.
6. Check each turn signal switch position value with the DATA LIST menu.
When the turn signal switch is in left position

When the turn signal switch is in right position

Are ail data list values correct?
YES
-Faulty driver's MICU; replace the driver's under-dash fuse/relay box, USA models (see page 22-86), Canada models (see page 22-87).
NO
-Go to step 7.
7. Turn the ignition switch to LOCK (0).
8. Disconnect the combination light switch 12P connector.
9. Disconnect driver's under-dash fuse/relay box connector R (24P).
10. Check for continuity between body ground and driver's under-dash fuse/relay box connector R (24P) terminals No. 13 and No. 14 individually.
D R I V E R ' S U N D E R - D A S H F U S E / R E L A Y B OX C O N N E C T O R R (24P)
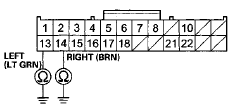
Wire side of female terminals
Is there continuity? YES
-Repair a short to ground in the wire.
NO
-Go to step 11.
11. Check for continuity between driver's under-dash fuse/relay box connector R (24P) terminals No. 13 and No. 14.
D R I V E R ' S U N D E R - D A S H F U S E / R E L A Y B OX C O N N E C T O R R (24P)
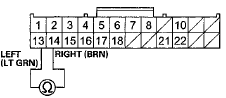
Wire side of female terminals
Is there continuity? YES
-Repair a short between the w i r e s . NO
-Replace the combination light switch (see page 22-232).
 Circuit Diagram
...
 MICU Input Test
NOTE:
• Before testing, troubleshoot the multiplex
integrated control unit first, using B-CAN System Diagnosis Test Mode A
(see page 22-134).
• Before testing, make sure the No. 5 (7. ...
See also:
Carrier Bearing Outer Race
Replacement
Special Tools Required
-Driver Handle, 15 x 135L 07749-0010000
-Attachment, 78 x 80 mm 07NAD-PX40100
-Attachment, 72 x 75 mm 07746-0010600
NOTE:
-The bearing and the bearing outer race should be
...
Playing AM/FM Radio
• Preset Memory
To store a station:
1. Tune to the selected station.
2. Press the MENU button.
3. Rotate to select Save Preset,
then press .
4. Rotate to select the preset
number you ...
DTC Troubleshooting Index
NOTE: Before you troubleshoot record all freeze data and any on-board
snapshot with the HDS, and review General
Troubleshooting Information (see page 14-4).
NOTE:
*1: The DTC in parentheses is ...