 Honda Accord: Driver's Power Seat Motor Test
1. Remove the d r i v e r ' s seat (see page 20-194).
2. Remove t h e p o w e r seat adjustment switch knobs a nd t h e recline cover f r om t h e seat.
• 4-door (see page 20-234) • 2-door (see page 20-226) 3. Disconnect t h e 12P connector (A) from t h e p o w e r seat adjustment switch (B).
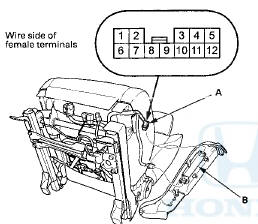
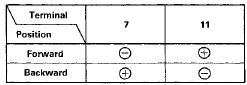
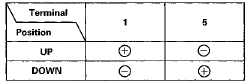
4. At the 12P connector of the driver's seat wire harness side, test the motor by applying battery power and ground to the terminals according to the table.
Slide motor
Recline motor
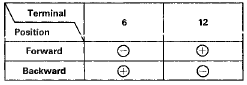
Front up-down motor
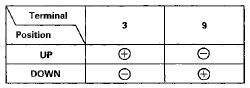
Rear up-down motor
5. If the motor does not run or fails to run smoothly, go to step 6.
6. Disconnect the 2P connector from each motor.
NOTE; • For the recline motor, remove the seat back panel.
- 4-door (see page 20-221) - 2-door (see page 20-213) • All connector views are wire side of female terminals.
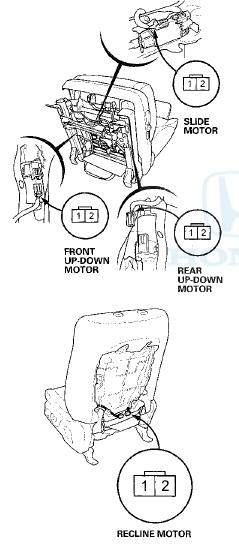
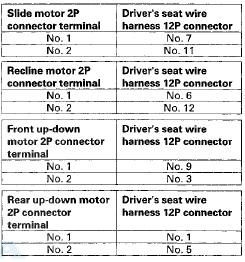
7. Check for continuity between each motor 2P connector and the driver's seat wire harness 12P connector. If there is continuity, replace the appropriate motor: • Recline motor (see page 20-200) • Slide motor (see page 20-204) NOTE: The front and rear up-down motors are part of the up-down adjuster.
 Power Seat Adjustment Switch
Test/Replacement
Power Seat Adjustment Switch
Test/Replacement
1. Remove the driver's seat (see page 20-194).
2. Remove the power seat adjustment switch knobs (A) and the recline cover from
the driver's seat.
• 4-door (see page 20-234)
• 2-door ...

See also:
Engine Oil Gallery Cap Replacement
1. Remove the harness bracket (A), then remove the
engine oil gallery cap (B).
2. Clean the O-ring groove and mating surface with the
engine oil gallery cap.
3. Apply new engine oil to new O-r ...
Features
This chapter describes how to operate technology features. ...
Rearview Mirror Replacement
Without Automatic Dimming Mirror
1. Turn the rearview mirror base (A) 90 В°.
2. Slide the rearview mirror base (A) down toward the
bottom of the windshield to detach it from the spring
(B) in ...