 Honda Accord: Control Unit Input
Test/Replacement
Honda Accord: Control Unit Input
Test/Replacement
1. Remove the driver's dashboard lower cover (see page 20-166).
2. Remove the screws, then disconnect the 28P connector (A) from the HandsFreeLink control unit (B).
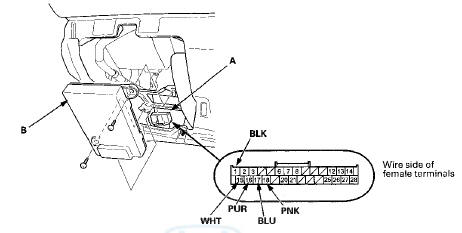
3. Inspect the connector and socket terminals for a good pinfit to be sure they are all making good contact.
• If the terminals are bent, loose or corroded, repair them as necessary, and recheck the system.
• If the terminals look OK, go to step 4.
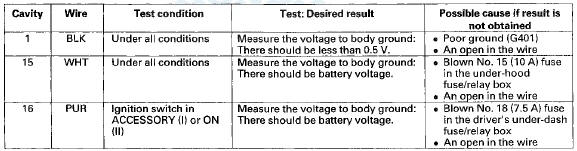
4. Reconnect the connector, and make these input tests at the connector.
• If any test indicates a problem, find and correct the cause, then recheck the system.
• If all the input tests prove OK, go to step 5.
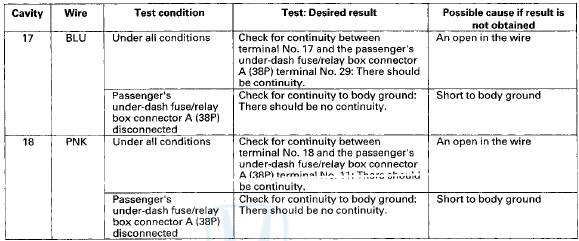
5. Disconnect the 28P connector again, and make this input test at the connector.
• If the test indicates a problem, find and correct the cause, then recheck the system.
• If the input test proves OK, the HandsFreeLink control unitis faulty, replace it.
 HFL Switch Removal/Installation
1. Remove the steering wheel (see page 17-6).
2. Remove the HFL switch (see page 17-7).
3. Install the HFL switch in the reverse order of removal. ...
 Restraints
Special Tools
...
See also:
Carbon Monoxide Hazard
Your vehicle’s exhaust contains
carbon monoxide gas. Carbon
monoxide should not enter the
vehicle in normal driving if you
maintain your vehicle properly and
follow the information on this ...
HomeLink Universal Transceiver
All V6 models
The HomeLink universal
transceiver built into your vehicle
can be programmed to operate up to
three remotely controlled devices
around your home, such as garage
doors, lightin ...
All Children Should Sit in a Back Seat
According to crash statistics,
children of all ages and sizes are
safer when they are restrained in a
back seat.
The National Highway Traffic Safety
Administration and Transport
Canada reco ...