 Honda Accord: Steering Wheel Installation
SRS components are located in this area. Review the SRS component locations: 4-door {see page 24-21), 2-door (see page 24-23) and the precautions and procedures (see page 24-25) before doing repairs or service.
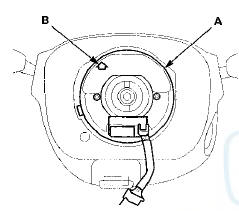
1 Before installing the steering wheel, make sure the front wheels are pointing straight ahead, then center the cable reel (A). Do this by first rotating the cable reel clockwise until it stops. Then rotate it counterclockwise about three full turns. The arrow mark (B) on the cable reel label should point straight up.
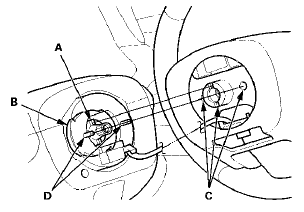
2. Position the two tabs (A) of the turn signal canceling sleeve (B) as shown. Install the steering wheel on to the steering column shaft, making sure the steering wheel hub (C) engages the pins (D) of the cable reel and tabs of the turn signal canceling sleeve. Do not tap on the steering wheel or steering column shaft when installing the steering wheel.
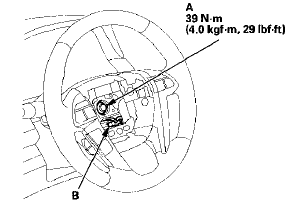
3. Install the steering wheel bolt (A), and tighten it to the specified torque. Connect the cable reel subharness connector (B). Make sure the wire harness is routed and fastened properly.
4. Install the driver's airbag (see page 24-211).
5. Do the battery terminal reconnection procedure {see page 22-91), and check these items: -Turn the ignition switch to ON (II) and check that the SRS indicator comes on for about 6 seconds, and then goes off.
-Make sure the horn and turn signal switches work properly.
-Make sure the steering wheel switches work properly.
6. After installation, check the steering wheel spoke angle. If the steering spoke angles to the right and left are not equal (steering wheel is not centered), correct the engagement of the wheel/column shaft splines.
 Steering Wheel Disassembly/Reassembly
4-door
*: With Navigation
2-door
*: With Navigation ...
 Steering Column Removal and Installation
SRS components are located in this area. Review the
SRS component locations: 4-door (see page 24-21 )f
2-door (see page 24-23) and the precautions and
procedures (see page 24-25) before doing repai ...
See also:
Playing Internet Radio
Connect a compatible phone through Bluetooth®.
You can also connect the phone using your dock connector to the USB port.
Make sure the audio setting is correct for the connection type.
Select ...
Countershaft Bearing Replacement
Special Tools Required
-Adjustable Bearing Puller, 2 5 - 4 0 mm 07736-A01000B
-Driver Handle, 15 x 135L 07749-0010000
-Attachment, 62 x 68 mm 07746-0010500
1. Remove the countershaft bearing using ...
Using HFL
HFL Buttons
HFL Talk button - Press and release to give a command or answer
a call.
HFL Back button - Press and
release to end a call, go back to the
previous command, or cancel the
comman ...