 Honda Accord:
Emblem/Sticker Replacement
Honda Accord:
Emblem/Sticker Replacement
2-door
NOTE: When removing emblems/sticker, take care not to scratch the body.
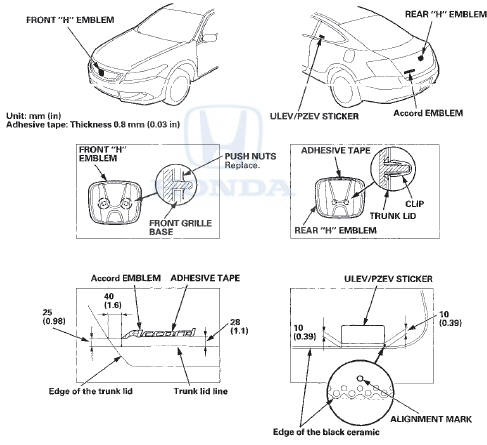
1. To remove the front "H" emblem, remove the front bumper (see page 20-255).
2. Clean the body surfaces where emblems/sticker are applied with a shop towel dampened in isopropyl alcohol. After cleaning, keep oil, grease, and water from getting on the surface.
3. Apply the emblems/sticker where shown. When installing the ULEV/PZEV sticker on the inside surface of the left quarter glass, align the sticker with the edge of the black ceramic as shown, and press the sticker into place, then remove the application tape.
4-door
NOTE: When removing emblems/sticker, take care not to scratch the body.
1. To remove the front " H " emblem, remove the front grille (see page 20-275).
2. Clean the body surfaces where emblems/sticker are applied with a shop towel dampened in isopropyl alcohol. After cleaning, keep oil, grease, and water from getting on the surface.
3. Apply the emblems/sticker where shown. When installing the ULEV/PZEV sticker on the inside surface of the left rear door quarter glass, align the sticker with the edge of the glass mark and the rear door quarter glass seal as shown, and press the sticker into place, then remove the application tape.

 Trunk Lower Trim Replacement
4-door
NOTE:
- Put on gloves to protect your hands.
- Take care not to scratch the trunk lid.
1. Remove the license plate from the trunk lid.
2. Remove the clips fastening the trunk lower t ...
 Fenderwell
...
See also:
Opening/Closing theWindows and Moonroof with the Key
You can open and close the windows
and the moonroof (if equipped) with
the key in the driver’s door lock.
To open:
1. Insert the key in the driver’s door
lock.
2. Turn the key clockwise ...
Tripped Sensor History
The security s y s t em stores information o n t h e last
tripped sensor if t h e security s y s t em has been actuated.
The information can be retrieved u s i n g t h e HDS.
To retrieve t h e ...
Recommended Engine Oil
Oil is a major contributor to your engine's
performance and longevity. If you drive the
vehicle with insufficient or deteriorated oil,
the engine may fail or be damaged.
This seal indicates ...