 Honda Accord: Trim Removal/Installation
Door Areas
Honda Accord: Trim Removal/Installation
Door Areas
Special Tools Required
KTC Trim Tool Set SOJATP2014*
*Available through the Honda Tool and Equipment Program; call 888-424-6857
Door Sill Area - 2-door
NOTE: - Put on gloves to protect your hands.
- Take care not to bend or scratch the trim or the panels.
- Use the appropriate tool from the KTC trim tool set to avoid damage when removing components.
1. Driver's side: Remove the front side cap from the door sill trim (see step 1 on page 20-303).
2. Driver's side: Remove the trunk lid/fuel fill door opener lock cylinder, and loosen the opener mounting bolt (see step 2 on page 20-303).
3. Driver's side: Remove the screw securing the door sill trim and the trunk lid opener/fuel fill door opener (see step 3 on page 20-304).
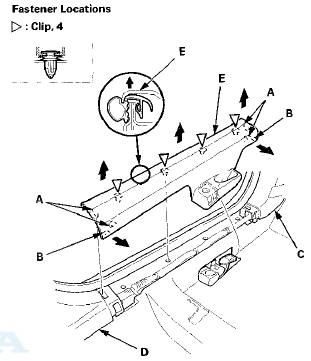
4. Release the hooks (A) and the tabs (B) from the kick panel (C) and the rear side trim panel (D). Pull up the door sill trim (E) by hand to detach the clips, then remove the trim.
Driver's side
Passenger's side
5. Remove the kick panels (A).
-1. Pull out the door opening seal (B) as needed from the kick panel hooks (C).
-2. Pull the kick panel back by hand to detach the clips.
Driver's side

Passenger's side
6. Pull out the door opening seal (A) from the trim hooks (B) around the door opening flange, then remove the seal.
7. Install all of the removed parts in the reverse order of removal, and note these items: - If the clips are damaged or stress-whitened, replace them with new ones.
- Driver's side: Before tightening the trunk lid/fuel fill door opener mounting bolt, position the door sill trim against the opener firmly by screwing the trim onto the opener.
- Push the clips, the hooks, and the tabs into place securely.
Special Tools Required
KTC Trim Tool Set SOJATP2014*
- Available through the Honda Tool and Equipment Program; call 888-424-6857
Front Door Sill Area - 4-door
NOTE: - Put on gloves to protect your hands.
- Take care not to bend or scratch the trim or the panels.
- Use the appropriate tool from the KTC trim tool set to avoid damage when removing components.
1. Driver's side: Remove the front side cap from the front door sill trim (see step 1 on page 20-303).
2. Driver's side: Remove the trunk lid/fuel fill door opener lock cylinder, and loosen the opener mounting bolt (see step 2 on page 20-303).
3. Driver's side: Remove the screw securing the front door sill trim and trunk lid opener/fuel fill door opener (see step 3 on page 20-304).
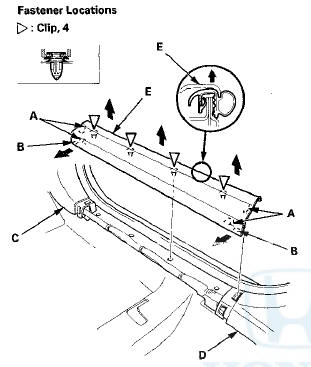
4. Release the hooks (A) and the tabs (B) from the kick panel (C) and the B-pillar lower trim (D). Pull up the front door sill trim (E) by hand to detach the clips, then remove the trim.
Driver's side
Passenger's side
5. Remove the kick panels (A).
-1. Pull out the door opening s e a l (B) as n e e d e d from the kick panel hooks (C).
-2. Pull back the kick panel by hand to detach the clips.
Driver's side
Passenger's side
6. Pull out the front door opening seal (A) from the trim hooks (B) around the front door opening flange, then remove the seal.
7. Install in the reverse order of removal, and note these items: - If the clips are damaged or stress-whitened, replace them with new ones.
- Driver's side: Before tightening the trunk lid/fuel fill door opener mounting bolt, position the front door sill trim against the opener firmly by screwing the trim onto the opener.
- Push the clips, the hooks, and the tabs into place securely.
Rear Door Sill Area - 4-door
NOTE: - Put on gloves to protect your hands.
- Take care not to bend or scratch the trim or the panels.
- Use the appropriate tool from the KTC trim tool set to avoid damage when removing components.
1. Remove the rear seat cushion (see page 20-241).
2. Release the hooks (A) and the tab (B) from the B-pillar lower trim (C). Pull up the rear door sill trim (D) by hand to detach the clips (E, F), then remove the trim from the rear door opening seal (G).
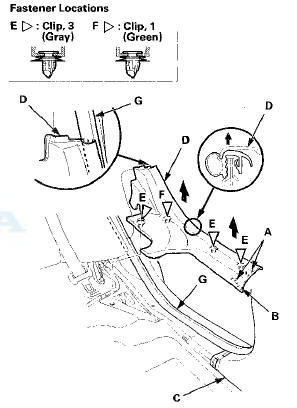
3. Pull out the rear door opening seal (A) from the trim hooks (B) around the rear door opening flange, then remove the seal.

4. Install the trim in the reverse order of removal, and note these items: - If the clips are damaged or stress-whitened, replace them with new ones.
- Push the clips, the hooks, and the tab into place securely.
 Component Location Index
2-door
4-door
...
 Trim Removal/Installation - Pillar
Areas
Trim Removal/Installation - Pillar
Areas
Special Tools Required
KTC Trim Tool Set SOJATP2014*
*Available through the Honda Tool and
Equipment
Program; call 888-424-6857
A-Pillar Trim
SRS components are located in this area. Review the ...
See also:
Rear Seat-back Release Lever/Cable
Removal/Installation
NOTE:
- Take care not to bend or scratch the interior trim.
- 4-door is shown; 2-door is similar.
1. Remove the rear shelf (see page 20-128).
2. Disconnect the seat-back release cable (A) fr ...
Interior Care
Use a damp cloth with a mixture of mild detergent and warm water to remove
dirt.
Use a clean cloth to remove detergent residue.
Do not spill liquids inside the vehicle.
Electrical devices and ...
Glove Box Removal/Installation
Special Tools Required
KTC Trim Tool Set SOJATP2014*
*Available through the Honda Tool and Equipment
Program; call 888-424-6857
SRS components are located in this area. Review the
SRS component l ...