 Honda Accord: Stabilizer Bar Replacement
1. Raise and support the vehicle (see page 1-13).
2. Remove the rear wheels.
3. Disconnect both stabilizer links from the stabilizer bar (see page 18-47).
4. Remove the flange bolts (A) and the bushing holders (B), then remove the bushings (C) and the stabilizer bar (D).
NOTE: During installation, align the paint marks (E) on the stabilizer bar with the side of the bushings.
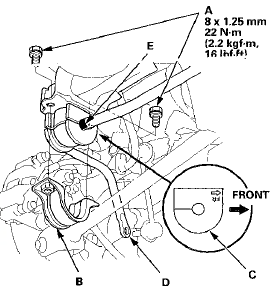
5. Install the stabilizer bar in the reverse order of removal, and note these items: - Note the right and left direction of the stabilizer bar.
- Note the direction of installation for the bushing.
- Refer to the stabilizer link removal/installation to connect the stabilizer bar to the links (see page 18-47).
- Before installing the wheel, clean the mating surfaces of the brake disc and the inside of the wheel.
 Stabilizer Link Removal/Installation
1. Raise and support the vehicle (see page 1 -13).
2. Remove the rear wheel.
3. Remove the flange nut (A) and the self-locking nut (B)
while holding the respective joint pin (C) with a hex
wre ...
 Damper/Spring Removal and Installation
Removal
1. Raise and support the vehicle (see page 1-13).
2. Remove the rear wheel.
3. Fold down the rear seat-back, then remove the lid (A).
NOTE: For 4-door, lift up the tab (B) inside und ...
See also:
How the Side Airbag Off Indicator Works
This indicator alerts you that the
passenger’s side airbag has been
automatically shut off. It does not
mean there is a problem with your
side airbags.
When you turn the ignition switch t ...
Power Mirror Replacement
NOTE: Take care not to scratch the door.
1. Lower the door glass fully.
2. With your hand, carefully pull out the top edge of the
tweeter cover (A) to release the upper hooks (B) and
detach th ...
Secondary H02S Replacement
Special Tools Required
02 Sensor Wrench Snap-on S6176 or equivalent,
commercially available
1. Disconnect the secondary H02S 4P connector (A),
then remove the secondary H02S (B).
2. Install the ...