 Honda Accord: Power Mirror Replacement
NOTE: Take care not to scratch the door.
1. Lower the door glass fully.
2. With your hand, carefully pull out the top edge of the tweeter cover (A) to release the upper hooks (B) and detach the clip. Remove the cover by lifting it upward to release the bottom hooks (C). Disconnect the tweeter connector (D).
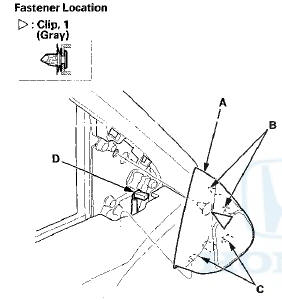
3. Disconnect the power mirror connector (A).
4. While holding the power mirror, remove the nuts securing the mirror.
5. While holding the power mirror (A), squeeze the retaining tabs on the connector clip (B), then push out to remove the power mirror.
6. Install the mirror in the reverse order of removal, and note these items: - Make sure the connectors are plugged in properly.
- If the clip is damaged or stress-whitened, replace it with a new one.
- Push the clip and the hooks on the cover into place securely.

 Mirror Holder Replacement
NOTE:
- Put on gloves to protect your hands.
- When prying with a flat-tip screwdriver, wrap it with
protective tape to prevent damage.
1. Carefully push on the top edge of the mirror holder ( ...
See also:
Steering Wheel Disassembly/Reassembly
4-door
*: With Navigation
2-door
*: With Navigation ...
Rear Air Outlet Replacement
NOTE: Take care not to scratch the body.
1_ Remove the rear bumper (see page 20-260).
2. Release the hooks (A), then remove the rear air outlet
(B).
3. Install the air outlet by pushing on t ...
Front Fender Trim Replacement
2-door
NOTE:
- Take care not to scratch the front grille cover or the
body.
- When prying with a flat-tip screwdriver, wrap it with
protective tape to prevent damage.
- The left side is show ...