 Honda Accord: Replacing a Fog Light Bulb
If equipped
Your vehicle uses halogen light bulbs. When replacing a bulb, handle it by its plastic case, and protect the glass from contact with your skin or hard objects. If you touch the glass, clean it with denatured alcohol and a clean cloth.

Halogen light bulbs get very hot when lit. Oil, perspiration, or a scratch on the glass can cause the bulb to overheat and shatter.
The fog lights were properly aimed when your vehicle was new. If you regularly carry heavy items in the trunk or pull a trailer, readjustment may be required. Adjustment should be done by your dealer or another qualified technician.
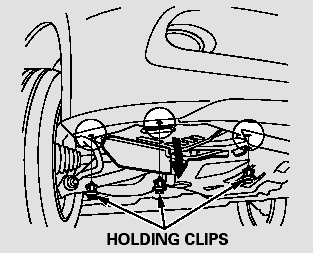
1. Passenger’s side
Remove the three holding clips with a flat-tip screwdriver.
Pull down the under cover from the bumper carefully.
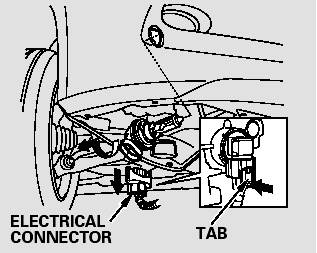
2. Remove the electrical connector from the bulb by pushing on the tab to unlock it, then slide the connector off the bulb.
3. Remove the bulb by turning it about one-quarter turn counterclockwise.
4. Driver’s side
To change the bulb, start the engine, turn the steering wheel all the way to the right, then turn off the engine.
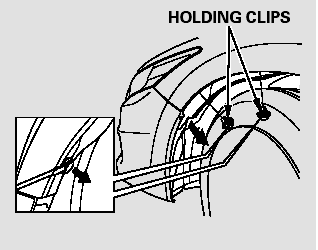
5. Use a flat-tip screwdriver to remove the two holding clips from the inner fender, and pull the inner fender cover back.
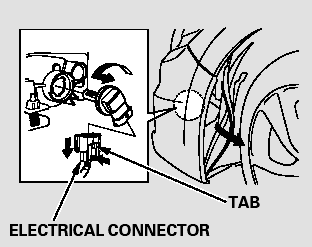
6. Remove the electrical connector from the bulb by pushing on the tab and pulling the connector down.
7. Remove the bulb from the fog light assembly by turning it onequarter turn counterclockwise.
8. Insert the new bulb into the hole, and turn it one-quarter turn clockwise to lock it in place.
9. Push the electrical connector back onto the bulb. Make sure it is on all the way.
10. Turn on the fog lights to test the new bulb.
11. Passenger’s side
Reinstall the under cover and put the holding clips back in place.
Driver’s side
Reinstall the inner fender. Make sure it is installed under the edge of the front bumper.
Reinstall the holding clips, and push in the head of each clip.
 Replacing the High-mount Brake Light Bulb
1. Open the trunk, and remove the
socket from the light assembly by
turning it one-quarter turn counterclockwise.
2. Pull the bulb straight out of its
socket. Push the new bulb straight
int ...
 Rear License Plate Light Bulbs
The license plate has two lights
above it. The bulbs should be
replaced by your dealer. ...
See also:
Auto Door Locking/Unlocking
Your vehicle has customizable
settings for the doors to
automatically lock and unlock. There
are default settings for each of these
features. You can turn off or change
the settings for thes ...
DTC Troubleshooting
DTC P0101: MAF Sensor Circuit
Range/Performance Problem
NOTE:
- Before you troubleshoot, record all freeze data and
any on-board snapshot, and review the general
troubleshooting information (see ...
4th and 5th Clutch Reassembly
Special Tools Required
Clutch Spring Compressor Set 07LAE PX40000
1. Soak the clutch discs thoroughly in ATF for at least
30 minutes.
2. Install new O-rings (A) on the clutch piston (B). Do not
...