 Honda Accord: Pump Overhaul
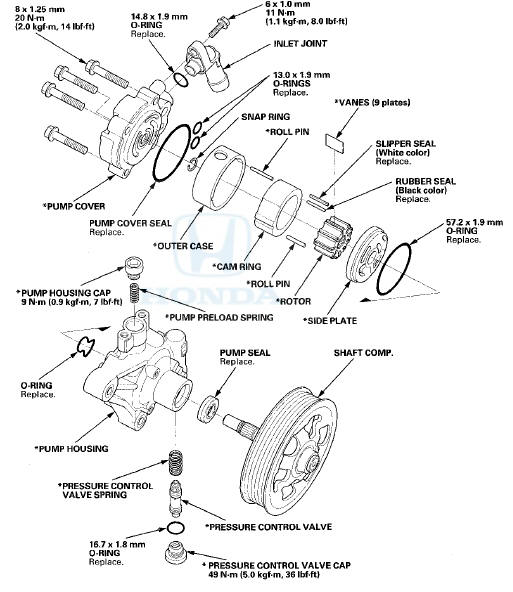
Exploded View
Replace the pump as an assembly if any of the parts indicated with an asterisk (*) are worn or damaged.
Special Tools Required
-Attachment, 32 x 35 mm 07746-0010100
-Driver Handle, 15 x 135L 07749-0010000
Disassembly
NOTE: Refer to the Exploded View as needed during the following procedure.
1. Remove the power steering pump (see page 17-30).
2. Drain the remaining fluid from the power steering pump.
3. Remove the inlet joint and the O-ring.
4. Remove the pressure control valve cap, the O-rmg, the pressure control valve, and the spring.
5. Remove the pump housing cap and the pump preload spring.
6. Remove the pump cover, the pump cover seal, and the O-rings.
7. Remove the snap ring, then remove the rotor, the vanes, the cam ring, the outer case, the side plate, and the O-rings.
8. Remove the shaft comp. by tapping the shaft end with a soft face hammer.
9. Remove the pump seal from the pump housing.
Inspection
10. Check the pressure control valve for wear, burrs, and other damage to the edges of the grooves in the valve.
11. Inspect the bore of the pressure control valve on the pump housing for scratches and wear.
12. Slip the pressure control valve back in the pump housing, and check that it moves in and out smoothly.
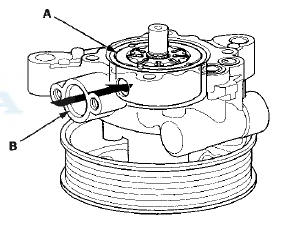
If OK, go to step 13; if not, replace the pump as an assembly. The pressure control valve (A) is not available separately.
13. Attach a hose (A) to the end of the pressure control valve (B) as shown. Then submerge the pressure control valve in a container of power steering fluid (C), and apply compressed air in the hose.
-If air bubbles leak through the valve at less than 98 kPa (1.0 kgf/cm2,14.2 psi), replace the pump as an assembly. The pressure control valve is not available separately.
-If the pressure control valve is OK, set it aside for reassembly later.
Reassembly
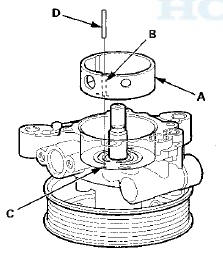
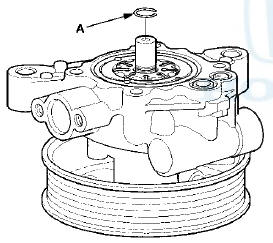
14. Install the new pump seal (A) (with its grooved side facing in) into the pump housing (B) by hand first, then drive it in using the driver handle and attachment until the pump seal is flush with the pump housing, and the seal is fully seated in the pump housing.
15. Install the shaft comp. into the pump housing.
16. Coat the new O-ring (A) with power steering fluid, and install it into the groove in the pump housing (B).
17. Coat the new 57.2 mm O-ring (A) with power steering fluid, and install it into the groove in the side plate (B).
18. Set the side plate with the slot (C) facing up, and align the hole (D) in the side plate and the slot (E) in the pump housing.
19. Install the outer case (A) by aligning the slot (B) inside the pump housing with the roll pin hole (C) on the side plate.
20. Install the roll pin (D) into the set hole.
21. Install the cam ring (A) by aligning the slot (B) outside of the cam ring with the slot (C) in the outer case.
22. Apply power steering fluid to the rubber seal (D) (black) and slipper seal (E) (white), and install them in the slot (F) of the cam ring.
23. Install the roll pin (A) into the slots between the cam ring (B) and outer case (C), then push the roll pin into the set hole.
24. Install the rotor (A) in the cam ring (B).

25. Set the 9 vanes (C) into the grooves in the rotor. Make sure that the gold-colored ends (D) of the vanes are in contact with the sliding surface of the cam ring.
26. Install the snap ring (A).
27. Coat the new 13.0 mm O-rings (A) with power steering fluid, and install them into the grooves in the pump housing (B).
28. Push in the cam ring (A) from the pump housing cap hole (B) with a flat-tip screwdriver to make sure the cam ring is fully seated against the outer case.
29. Coat the new pump cover seal (A) with power steering fluid, and install it into the groove in the pump cover (B).
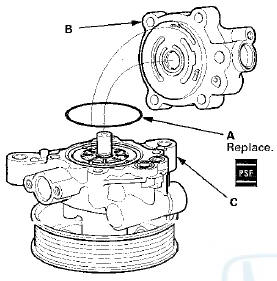
30. Install the pump cover assembly over the pump housing (C).
31. Align the bolt holes in the cover (A) with the threaded holes in the pump housing. Install the flange bolts loosely first, then tighten the flange bolts to the specified torque alternately in two or more steps.
32. Install the pump preload spring (A) in the pump housing (B).

NOTE: Be careful not to damage the pump outlet hose connecting surface (D) pump housing when installing the housing cap.
34. Install the spring (A) in the pump housing.
35. Coat the pressure control valve (B) with power steering fluid, and install it in the pump housing.
36. Coat the new 16.7 mm O-ring (C) with power steering fluid, and install it on the pressure control valve cap (D).
37. Install the pressure control valve cap on the pump housing, and tighten it to the specified torque.
38. Coat the new 14.8 mm O-ring (A) with power steering fluid, and install it on the inlet joint (B). Install the inlet joint with a flange bolt (C) on the pump housing, and tighten to the specified torque.
39. Check that the power steering pump turns smoothly by turning the pulley by hand. If it turns hard, loosen the four flange bolts on the pump cover, then retighten them in the same manner as in step 31.
Retest. if the power steering pump is still hard to turn, replace the power steering pump.
40. Reinstall the power steering pump (see page 17-30).
 Pump Replacement
1. Place a suitable container under the vehicle to catch
any spilled fluid.
2. Drain the power steering fluid from the reservoir (see
page 17-28).
3. Remove the drive belt (A) from the pump pu ...
 Steering Gearbox Removal
Special Tools Required
-Engine Hanger Adapter VSB02C000015*
•Engine Support Hanger, A and Reds
AAR-T1256*
-Ball Joint Remover, 28 mm 07MAC-SL0A202
-Ball Joint Thread Protector, 12 mm
07AA ...
See also:
Dust and Pollen Filter Replacement
1. Open the glove box. Remove the glove box stop on
the right side, then let the glove box hang down (see
page 20-174).
2. Remove the dust and pollen filter assembly (A) from
the blower unit.
...
Troubleshooting
Special Tools Required
Vacuum Pump/Gauge, 0-”30 inHg Snap-on YA4000A or
equivalent commercially available
NOTE:
- Check the vacuum hoses and the lines for damage and
proper connections befor ...
Steering Wheel Installation
SRS components are located in this area. Review the
SRS component locations: 4-door {see page 24-21),
2-door (see page 24-23) and the precautions and
procedures (see page 24-25) before doing repair ...