 Honda Accord: General Troubleshooting
Information
Honda Accord: General Troubleshooting
Information
General Operation
Refer to the navigation system manual for the navigation system operating procedures.
Anti-theft Feature
The navigation system and audio unit have a coded theft protection circuit Make sure you have the anti-theft security code before; • Disconnecting the battery.
• Disconnecting the navigation unit connector A (8P).
• Removing the No. 15 (10 A) fuse from the under-hood fuse/relay box.
After service, reconnect power to the navigation unit, and turn the ignition switch to ON (II). Enter the 4-digit anti-theft security code, then select Done.
If the code cannot be found, use the interactive Network (iN) to look it up. You can view the serial number in one of the ECU Info diagnostic screens (see page 23-176).
Alternatively, you can find the serial number on the underside label which is located on the navigation unit in the trunk.
When replacing the navigation unit, be sure to give the customer the new anti-theft security code.
Symptom Diagnosis
Certain circumstances and system limitations will result in occasional vehicle positioning errors. Some customer's may think this indicates a problem with the navigation system when, in fact, the system is normal.
Keep the following items in mind when interviewing customer's about symptoms of the navigation system.
Self-lnertial Navigation Limitations
The limitations of the self-inertial portion of the navigation system (the yaw rate sensor and the vehicle speed signal) can cause discrepancies between the vehicle's actual position and the indicated vehicle's position (GPS vehicle position).
The following circumstances may cause vehicle positioning errors: • Moving the vehicle with the engine stopped and the vehicle stopped, such as by ferry or tow truck, or if the vehicle is spun on a turn table.
• Tire slippage, changes in tire rolling diameters, and some driving situations may cause discrepancies in travel distances. Examples of this include:
- Continuous tire slippage on a slippery surface
- Driving with snow chains mounted
- Abnormal tire pressure
- Incorrect tire size
- Frequent lane changes across a wide highway
- Continuous driving on a straight or gently curving highway
- Very bumpy roads
• Tolerances in the system and map inaccuracies sometimes limit how precisely the vehicle's position is indicated. Examples of this include: - Driving on roads not shown on the map (map matching is not possible) - Driving on a road that winds in one direction, such as a loop bridge, an interchange, or a spiral parking garage
- Driving on a road with a series of sharp hair-pin turns
- Driving near a gradual highway exit or transition
- Driving on one of two close parallel roads
- Making many 90 degree turns
Global Positioning System (GPS) Limitations
The GPS cannot detect the vehicle's position or elevation during the following instances: • For the first 5 to 10 minutes after reconnecting the battery (this process can take as long as 45 minutes).
• When the satellite signals are blocked by tall buildings, mountains, tunnels, large trees, inside parking structures or large trucks.
• When the GPS antenna is blocked by metallic window tinting or by an object placed above it in the vehicle.
The GPS antenna requires a clear unobstructed view of the sky.
• When there is no satellite signal output (signal output is sometimes stopped for satellite servicing).
• When the satellite signals are blocked by the operation of some electronic aftermarket accessories including, but not limited to non-OEM in-dash entertainment units (radio, CD players/changers, radar detectors and theft recovery systems) and cell phones placed near the navigation system.
The accuracy of the GPS is reduced during these instances; • Metallic window tinting above the GPS antenna.
• When only three or less satellite signals are received (Four satellite signals are required for accurate positioning).
• When driving near high tension power lines.
• When the satellite control centers are experiencing problems.
Muting Logic
Whenever the navigation system is giving guidance, the front speakers are muted. When the navigation voice control system is being used, all of the speakers are muted. If the HandsFreeLink is in use, the voice control system is unavailable and a message appears onscreen.
LCD Display Unit Limitations
NOTE: The screen is not touch sensitive. Use the interface dial and buttons to select items on the screen.
• In cold temperatures, the display may stay dark for the first 2 or 3 minutes until it warms up.
• When the display is too hot because of direct summer sunlight, it will remain dark until the temperature drops (you may see an error message displayed stating this fact).
• When the humidity is high and the interior temperature is low, the display may appear cloudy.
The display will clear up after some use.
• Fingerprints on the screen may be noticeable. Clean the screen with a soft, damp cloth. You may use a mild cleaner intended for eye glasses or computer screens.
To avoid scratching the panel, do not rub too hard or use abrasive cleaners or shop towels.
Symptom Duplication
• When the symptom can be duplicated, verify that it is not a characteristic of the system. Review the navigation system manual and compare it to a known-good vehicle (with the same software and database), under the same conditions. If the symptom is not the same as the known-good vehicle, follow the self-diagnostic procedures and the appropriate troubleshooting procedures.
• When the symptom does not reappear or only reappears intermittently, ask the customer about the conditions when the symptom occurred.
- Always ask the customer to demonstrate the problem.
- Try to establish possible user error or misunderstanding of the system.
- Try to establish if outside interference may have been the cause.
- Try to duplication the symptom under the same .
conditions the customer experienced.
- Vibration, temperature extremes, and moisture (dew, humidity) are factors that are difficult to duplicate.
- Inspect the vehicle for after-market electronic devices (vehicle locators, amps, radar detectors, etc.) that may be hidden.

When troubleshooting navigation system problems, ensure that the known-good vehicle is the same software version year and model as the vehicle being serviced. Mixing incompatible navigation DVDs or other system components can delay the troubleshooting process by creating symptoms or issues causing effects unrelated to the original problem.
Service Precautions
• If you need to replace the navigation unit, you can back-up the navigation data and transfer it to a new navigation unit See Save users memory (see page 23-186).
• When the battery is disconnected, the internal GPS clock resets is reset to 0:00. The clock resets to the correct time after the system finishes GPS initialization.
• Before disconnecting the battery, make sure you have the anti-theft codes for the audio system and the navigation system. Also obtain any PGM-FI or transmission DTCs and freeze frame date (which are lost when the ECM/PCM loses power).
• After reconnecting the battery, you have to wait to get the initial signal from the satellite. It will take from 10 to 45 minutes.
• Adjust the setup clock settings (time zone and daylight savings) in the navigation system.
• Before returning the vehicle to the customer, enter the anti-theft codes for the audio system and the navigation system.
System Initialization
Ifthe navigation system loses power (like the battery was disconnected), the navigation system requires initialization. Once completed, your system is ready to use.
This initialization requires the following: • Entering the 4-digit anti-theft security code to unlock the system
• GPS initialization (may not be needed depending of the length of time the system was without power) • Map matching to align the GPS to a location on the map
Entering the Security Code
Any time the navigation system loses power, you need to enter the 4-digit anti-theft code on the navigation system display. This 4-digit code is located on a small code card that was given to the customer. Enter the 4-digit code.
If the navigation system anti-theft code is missing use the interactive Network (iN) to look it up. You need the serial number for the navigation unit to do this.
You can view the serial number by entering the diagnostic mode. Select Unit Check from the main menu, then the ECU info diagnostic screen. This gives you the serial number without removing the navigation unit.
The iN may display more than one code for a given serial number. This is because serial numbers are not unique.
You may have to try more than one 4-digit code.
If no code is shown, or ifthe code(s) given do not work in the navigation unit, contact the Automobile Warranty department. Ifthe code 0000 works, replace the navigation unit.
When replacing the navigation unit or audio unit, make sure you give the customer the new anti-theft security code.
GPS Initialization
NOTE: You must park the vehicle outside with a clear view of the southern sky.
Depending on the length of time the battery was disconnected, your system may require GPS initialization. If it does, the following screen appears:
If this procedure is not necessary, the system proceeds directly to the Disclaimer screen. During initialization, the system searches for all available GPS satellites, and obtains their orbital information. During this procedure the vehicle should be out in the open with a clear view of the sky.
If the navigation system finds the satellites properly, this box clears, and changes to the Disclaimer screen. If within 10 minutes the system fails to locate a sufficient number of satellites to locate your position, the following screen appears.
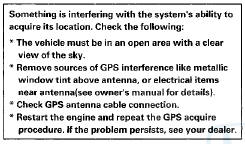
It this screen appears, turn off the engine, then restart the vehicle and move it to a different location. If the disclaimer screen appears, the GPS initialization is complete.
NOTE: • The average acquiring time is less than 10 minutes, but it can take as long as 45 minutes.
• if the system is still unable to acquire a signal, follow the instructions on the screen. If this screen appears again, go to troubleshooting for the GPS icon is white or not shown {see page 23-225).
• Skip to a CSF screen by pushing the MENU and the INFO buttons at the same time and you can move to a System Links screen.
Map Matching
This part of the initialization matches the GPS coordinates with a road on the map screen. To do this part of the procedure, make sure that the navigation system displays a map, and drive the vehicle on a mapped road shown on the map screen. Do not enter a destination at this time. When the name of the current road you are driving on, appears at the bottom of the screen, the entire procedure is complete. Your system is now ready to use.
Obtaining A Navigation DVD
If the navigation DVD is lost or damaged, or you need a yearly updated navigation DVD, you have two ways to purchase one. You can either call 888-549-3798, or order on-line at www.hondanavi.com.
Both methods require a credit card. The DVD for this model has a white label, and cannot be ordered through the parts system. The following DVDs will not work in this navigation system: • Earlier model navigation DVDs (black, orange, light blue label and the older versions with a white label) • Map software programs manufactured by other companies
• DVD movies, or DVDs containing audio recordings
Update DVDs are available for purchase usually in the fall of each year. They may contain the following: • Enhanced maps and points of interest (POI) coverage
• Fixes for minor software bugs
• Additional features
NOTE: • Map matching must be done any time the DVD is removed or replaced.
• Always order navigation DVDs on an as-needed basis.
During a typical model year, each color DVD may undergo a half a dozen software only version upgrades to fix minor issues on some or all models the DVD supports. This is normal. Usually only the letter at the end of the version number changes, while the database (maps and POIs) remain unchanged.
• Never promise your customer future free updates.
There are no free programs for updating the navigation DVD. Update DVDs are generally available for purchase each fall. The online DVD order site provides information when an update for a particular color DVD is available.
• Damaged discs are not covered by warranty unless they have been damaged by the navigation system.
Lever-Locked Connector
Disconnecting
To disconnect the connector, pull the lever (A) while pushing the lock tab (B) down, then pull the connector (C).
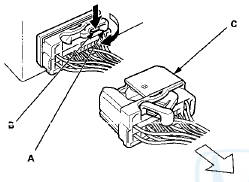
Connecting
To connect the connector, push the connector into the connector sleeve (A). As the connector is pressed in, the lever (B) moves to the locked position.
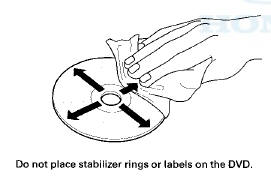
DVD Handling and Cleaning
To avoid damaging or leaving fingerprints on the DVD, always handle it by the edges and place it in a jewel case whenever it is outside the navigation unit. Deep scratches or fingerprints on the back of the DVD can cause intermittent rebooting or other system errors.
Smudges and fingerprints can be carefully removed using a mild cleaner and tissues designed to clean eyeglasses. To clean a DVD, use a clean soft cloth. Very gently wipe across the DVD from the center to the outside edge, never in a circular motion.
Earliest DVD Version Application for Each Model
Each navigation DVD contains a map/POl (point of interest) database and the navigation system software for each model that it supports. Inserting an older DVD can cause problems since it lacks the software to provide the specific features needed for that model.
Unfortunately, the navigation software does not detect or warn you that the version is outdated, and it may even appear to operate.
NOTE: Replacing a DVD just because the version number is higher is not always warranted. A higher software version does not necessarily mean it contains newer software for your model. The DVD contains software for all models that use the same color DVD, and a revised number may or may not have software fixes or upgrades for the model in question.
Typical warning symptoms that an outdated DVD is being used include: • The Honda model navigation screen displays a Acura logo while booting up.
• A newly introduced model feature or current accessory may not display properly, and Extension displays instead.
NOTE: Extension may be displayed when using Music Link, but should never be displayed when XM is selected.
• The current street (the street being driven on) does not appear properly at the bottom of the map screen display when the vehicle is driven on a main road.
NOTE: If necessary, compare the operation to the navigation system of the same model and year vehicle that has a current DVD.
How to Identify Navigation DVD Versions, and Mow to Inspect A DVD for Damage
To determine the navigation version on a particular model, start the engine, then locate the navigation unit.
Open the DVD door, and push the eject button to eject the DVD. Hold the DVD by the edges, and check for these items; • Check any official Honda service website for more service information about the navigation DVDs.
• The DVD label color.
• Read the DVD version on the label, and note it on the repair order. The version number is near the bottom of the label text (for example, ver: 4.23A). You will need this version number: - To verify that the DVD version is appropriate for the vehicle. Check any official Honda service website for more service information.
- Any time you call Tech Line regarding a navigation system issue.
- To answer customer inquires concerning update or coverage issue.
NOTE: Customers may obtain DVDs from sources outside the normal ordering process. If you determine this is the case, recommend that your customer purchase the appropriate DVD from the Honda Disc Fulfillment Center (see ORDERING A DVD).
- Check the underside of the DVD for signs of mishandling. Deep scratches, or random scratches, light swirl marks, or fingerprints can cause random lock-ups, reboots, erratic voice response, erratic positioning errors, and DVD read or format errors.
NOTE: A damaged DVD is not covered under warranty unless the disc is damaged by the navigation unit. Damage by the navigation unit typically appears as circular scratches caused by something rubbing against the DVD as it spins. The damage may appear as arcs or complete circles on the DVD reading surface.
- Verify that the underside of the DVD is silver, and not a copy with a blue color. Copies will not work properly and can cause other symptoms that mimic hardware problems.
• Incorrectly colored DVDs being put into navigation vehicles. This causes the system to either display error messages, or causes system malfunctions that mimic a hardware problem. This results in the customer leaving with a malfunctioning navigation system.
• The DVD version provided to the customer is out-of date or incompatible with a particular model. This inconveniences your customer by delaying the repair, or by causing additional (and unnecessary) returns to your dealership.
• The customer experiences bugs or other issues that have already been resolved in later versions currently available at the fulfillment desk.
If the DVD is defective, or has any of the issues mentioned above, return the vehicle to your customer and recommend that they order the proper DVD from the Honda Disc Fulfillment Center.
NOTE: If it is determined that the navigation unit is defective (through the appropriate service manual troubleshooting procedures) and the DVD will not eject, order a replacement navigation unit, and also order a DVD from the Honda Disc Fulfillment Center.
Navigation DVDs do not come with replacement navigation units. If you are replacing a navigation unit because it is defective (following appropriate service manual troubleshooting), and the DVD does not eject, order a DVD from the Disc Fulfillment Center.
How to Answer Customer Questions About Navigation Coverage
Some customers may ask questions regarding a city, address, or POI (point of interest) covered by the navigation system. It is better to verify a coverage question on an actual vehicle than to disappoint your customer by promising coverage that may be incomplete or missing in their area. The following suggestions can be used to answer coverage inquiries from your customer.
Is my address covered by the navigation system?
Using a current production vehicle (of the same model), try and enter the customer's address (street first) to see if their area is covered. Always enter the street first, because sometimes their city may be included in a neighboring township, or under some larger metropolitan city name. If the address is shown in a vehicle, you might recommend that your customer purchase an update.
Is my city covered by the navigation system?
For general questions about whether a city is covered, view the map coverage link on the DVD order site. On the site, select a year, and select a model, then click on the Coverage link. You then select a state or province, and the cities are listed. This does not guarantee that the customer's road or address is in the system. Verifying on an actual production vehicle is always the best guarantee that your information is accurate.
The gas station on my corner is now a restaurant. Why is it still incorrect in the navigation system?
For POI-related customer questions, explain that businesses are constantly moving, and there can be a considerable lag in updating the millions of POIs in the system. The database is updated annually, and the best way to the verify whether the POI is accurate is verify the inquiry on a current production vehicle.
Answers to these and other questions regarding coverage can be found in these locations: • In the Frequently Asked Questions section of the navigation system manual.
• At the online DVD order site, by clicking on the FAQs link.
How do S find the local address of a business that is part of a national chain (for example, Starbucks)?
There are three ways to find the local address to businesses: • If you know the phone number of the business, select Phone Number and enter the 10 digit phone number (area code plus seven digit number).
• Select Category, then Restaurant. Enter the keyword Star. The resulting list includes all restaurants that have the letters Star anywhere in the name.
• Select Name and enter Starbucks. For more common business names, like McDonalds, you may have to search through a list that includes other businesses l i ke McDonalds Welding, McDonalds Automotive, etc.
Why are some features different or missing compared to my previous Acura vehicle?
Hardware and software continually go through updates and improvements. Features may change or disappear overtime based on the navigation system development.
Precaution on Customer Navigation DVD "Sneak Previews"
Your customer might request a look (or sneak preview) at features in the latest navigation software. You should never preview a navigation DVD in a customer's vehicle.
Inserting a newer DVD installs the latest software from the DVD into the memory of the customer's navigation system. When the original DVD is reinstalled, the newer software remains in memory and is often incompatible with the customer's original DVD Map and POI database, or software.
If your customer wishes to see the latest navigation coverage or software features, demonstrate it on an in-stock vehicle that already has the latest DVD version.
If, a newer version is loaded either by the dealer or the customer, the only remedy is to enter the navigation diagnostic mode's Version screen and do a forced download. Check any official Honda service website for more information about what patches may need reinstalling.
How to Check Error History (Navigation DTCs)
NOTE: The navigation DTCs cannot be retrieved with the HDS.
The Error History feature is to record intermittent navigation issues that occur while using the system by setting navigation DTCs. Sometimes the customer complaint cannot be duplicated. The error history may record the information needed to diagnose the problem.
To check the error history: 1. Start the engine.
2. Press and hold the MAP/GUIDE, MENU, and CANCEL buttons for 3 seconds, or connect the SCS service connector to the navigation service connector located in the trunk.
3. When the Select Diagnosis Items menu is displayed, select Self-Diagnosis Mode.
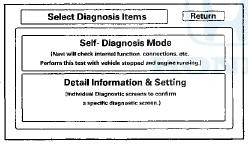
4. When the navigation unit has hard error codes, the Error History icon appears yellow when the Self Diagnosis mode (System links) screen is displayed.
When no hard errors are stored, the icon appears gray. To view the errors with their DTC codes, select the error history icon.
5. Select Hard Error.
NOTE: Soft errors are for factory use only.
Hardware Error History
8. The Hard Error screen displays the following information for each error:
• The DTC trouble code for the error
• A brief description of the DTC code
• The date and time when the error occurred
NOTE: • To see additional errors, use the interface dial to select UP or DOWN.
• Select Clear to delete the error history. The Save feature is for factory use only.
7. Use the DTC Symptom Troubleshooting table to troubleshoot the error.
8. Clear the DTCs.
9. Select Return to exit the error history.
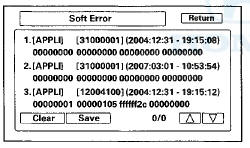
Software Error (Soft error) History
Software errors are not available. They are for factory use only.
How to Clear Error History
1. Do the steps in How to check Error History.
2. Select Clear in the error menu.
NOTE: • By selecting Clear, all software and hardware errors stored in history are erased at the same time.
• Save is for factory use only.
Hard error history is displayed
Soft error history is displayed {Software errors are for factory use only)
3. After selecting Clear then selecting Yes, both Hard Error history and Soft Error history are cleared at the same time.
Hard error history clear

Soft error history clear (Software errors are for factory u s e only)
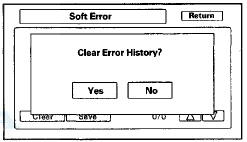
4. Press return to exit.


See also:
TPMS (Tire Pressure Monitoring System)
Instead of directly measuring the pressure in each tire, the TPMS on this
vehicle
monitors and compares the rolling radius and rotational characteristics of each
wheel and tire while you are dri ...
Rear Window Defogger
The rear window defogger will clear
fog, frost, and thin ice from the
window. Push the defogger button to
turn it on and off. The indicator in
the button comes on to show the
defogger is o ...
Special Tools
...