 Honda Accord: Gauge Control Module Replacement
NOTE: Before replacing the gauge control module, rewriting the ODO data and transferring the maintenance minder data to a new gauge control module (see page 22-350).
1. Remove the instrument visor (see page 20-165).
2. Remove the three screws from the gauge control module (A).
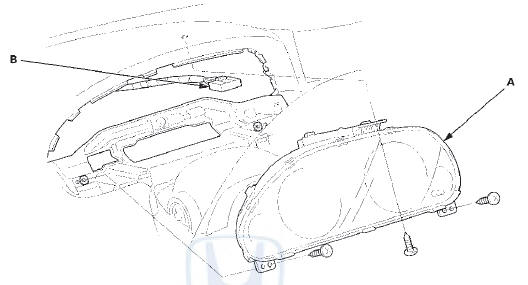
3. Disconnect the 32P connector (B) from the gauge control module.
4. Install the gauge control module in the reverse order of removal.
5. Rewriting the ODO data and transfer the maintenance minder data to a new gauge control module (see page 22-350).
 Rewriting the ODO Data and
Transferring the Maintenance
Minder Data to a New Gauge Control
Module
Rewriting the ODO Data and
Transferring the Maintenance
Minder Data to a New Gauge Control
Module
NOTE:
• Obtain a new gauge control module before starting
the rewriting process. Only new gauges can be
rewritten.
• Rewriting is not possible on a gauge control module
that will not ...
 Outside Air Temperature indicator
Calibration
Outside Air Temperature indicator
Calibration
NOTE: To test the outside air temperature sensor (see
page 21-185).
Description
The outside air temperature sensor is located behind the
center of the front bumper. The gauge control module
uses ...
See also:
LaneWatch TM*
Is an assistance system that allows you to check the passenger side rear
areas
displayed on the audio/information screen when the turn signal is activated to
the
passenger’s side. A camera i ...
Modifications
Do not modify your vehicle or use non-Honda components that can affect its
handling, stability, and reliability.
Overall vehicle performance can be affected. Always make sure all equipment
is
p ...
Folder Random
This feature, when activated, plays
all files in the current folder in
random order. To activate folder
random play, select FOLDER
RANDOM by using the interface
knob, and press ENTER on the ...