 Honda Accord: Front Seat Recline Motor Replacement
Driver's Seat (10-way Power Seat)
SRS components are located in this area. Review the SRS component locations, 2-door (see page 24-23), 4-door (see page 24-21) and the precautions and procedures (see page 24-25) before doing repairs or service.
NOTE: - Put on gloves to protect your hands.
- 4-door driver's seat is shown; 2-door driver's seat is similar.
1. Remove the front seat (see page 20-194).
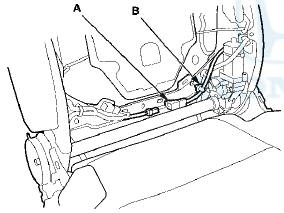
2. Remove the seat-back cover/pad: - 2-door (see page 20-213) -4-door (see page 20-221) 3. Disconnect and detach the recline motor connector (A), and detach the harness clip (B).
4. Release the push nut (A) from the motor side end of the connecting rod (B), gently tap on the motor side of the connecting rod to remove it from the recline motor (C) and both recline adjusters (D).
5. Remove the rod cover (E) and the collars (F).
6. Remove the mounting bolt, then remove the recline motor (A).
7. Install the recline motor in the reverse order of removal, and note these items: - Replace the push nut with a new one. Make sure the push nut is installed correctly.
- Make sure the recline motor connector is plugged in properly, and push the harness clip into place securely.
- Apply medium strength liquid thread lock to the mounting bolt before reinstallation.
- Check the front seat recline operation.
 Front Seat Removal/Installation
Special Tools Required
KTC Trim Tool Set SOJATP2014*
*Available through the Honda Tool and
Equipment
Program; call 888-424-6857
SRS components are located in this area. Review the
SRS component ...
 Front Seat Lumbar Support
Replacement
Front Seat Lumbar Support
Replacement
2-door Driver's Seat
SRS components are located In this area. Review the
SRS component locations (see page 24-23) and the
precautions and procedures (see page 24-25) before
doing repairs or servic ...
See also:
Features
The heating and air conditioning
system in your vehicle provides a
comfortable driving environment in
all weather conditions.
The standard audio system has
many features. This section
descr ...
Fuel Information
• Fuel recommendation
Use of a lower octane gasoline can cause a persistent, heavy metallic
knocking noise
that can lead to engine damage.
• Top tier detergent gasoline
Because the level ...
Childproof Door Locks
The childproof door locks prevent the rear doors from being opened from the
inside
regardless of the position of the lock tab.
• Setting the Childproof Door Locks
Slide the lever in the rear d ...