 Honda Accord: Front Seat-back Cover Replacement
Special Tools Required
- KTC Trim Tool Set SOJATP2014*
-Trim Pad Remover, Snap-on A177A or equivalent, commercially available
*Available through the Honda Tool and Equipment Program; call 888-424-6857
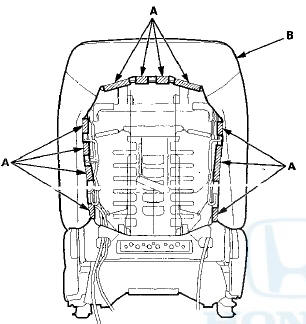
2-door
SRS components are located in this area. Review the SRS component locations {see page 24-23) and the precautions and procedures (see page 24-25) before doing repairs or service.
Do the OPDS sensor initialization (see page 24-40), after front passenger's seat-back cover replacement.
NOTE: - Put on gloves to protect your hands.
- Take care not to tear or damage the seat covers.
- Passenger's seat: Do not touch the OPDS sensor in the seat-back cover/pad, and keep it away from oil. Oil can corrode the sensor causing it to fail.
- Use the appropriate tool from the KTC trim tool set to avoid damage when removing components.
- Driver's seat is shown; passenger's seat is similar.
1 Remove the front seat (see page 20-194).
2. Driver's seat (10-way power seat): Remove the rear seat access knob (A). Remove the screw, then remove the rear seat access trim (B).
3. From under the seat cushion, release the elastic strap (A) from the seat cushion frame springs (B), then pull back the under cover (C) of the back cover.
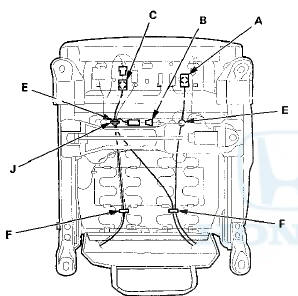
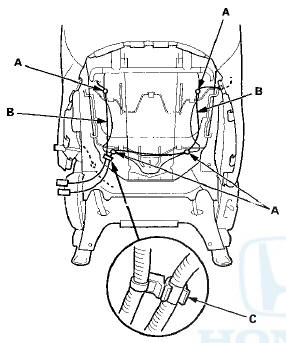
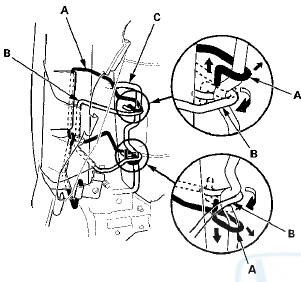
4. From under the seat cushion, disconnect and/or detach the connector(s): - Driver's seat (10-way power seat): - Side airbag connector (A) - Recline motor harness connector (B) - Seat-back heater connector (C) - Driver's seat (manual height adjustable seat)/ Passenger's seat: Side airbag connector (D)
Driver's seat (10-way power seat)
Driver's seat (manual height adjustable seat)
Passenger's seat

5. Detach the harness clip(s) (E), and remove the wire tie(s) (F). Driver's seat (manual height adjustable seat): Pry up the hooks (G) of the harness holder (H), then release the holder from the seat cushion frame spring (I).
6. Driver's seat (10-way power seat): Release the wire tie (J) of the harness clip fastening the recline motor harness, the seat-back heater harness, and the seat cushion heater harness together.
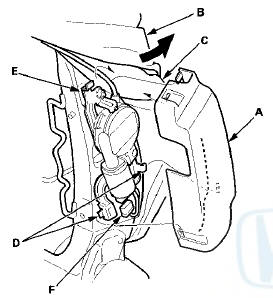
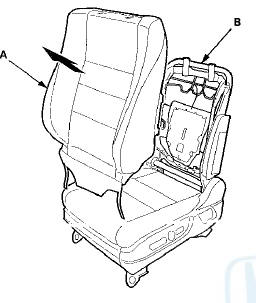
7. Remove the screws, then gently pull down the back panel (A) to release the hooks (B) from the seat-back frame, and remove the panel.
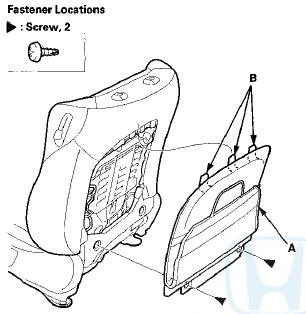
8. Driver's seat (10-way power seat): Pull out the side airbag harness (A), the recline motor harness (B) and the seat-back heater harness (C), through the loops (D). Release the hook strip (E), then pull out the harnesses through the harness holes (F) in the seat-back cover (G).
9. Driver's seat (manual height adjustable seat) /passenger's seat: Pull out the side airbag harnesses (A) through the loop(s) (B). Release the Velcro fasteners (C), the hook strip (D), and pull back the seat-back cover (E), then pull out the harness(es) through the harness hole(s) (F) in the seat-back cover.
Driver's seat (manual height adjustable seat)
Passenger's seat
10. Release the hook strips (A), then loosen the seat-back cover (B).
NOTE: The front seat with leather seat cover Is shown; the other types of seats are similar.
11. Remove the nut, then release the bracket (A) of airbag attachment wire C from the seat-back frame (B).
12. Release airbag attachment wire A and airbag attachment wire B from the seat-back frame (C).

13. Driver's seat with lumber support: Remove the lumbar support motor cover (A).
-1. Turn over the seat-back cover (B) and the pad (C) as needed.
-2. Release the cover from the lower hooks (D).
-3. Pull the cover upward to release it from the upper hook (E).
14. Driver's seat with lumber support: Disconnect the seat wire harness connector (F).
15. Passenger's seat: Remove the ODS unit cover (A).
-1. Turn over the seat-back cover (B) and the pad (C) as needed.
-2. Release the cover from the lower hooks (D).
-3. Pull the cover upward to release it from the upper hook (E).
16. Passenger's seat: Disconnect the seat wire harness connector (F) and the OPDS sensor connectors (G).
17. Passenger's seat: Detach the harness clips (A)
fastening the OPDS sensor harnesses (B), and release
the wire harness from the harness holder (C).
18. Driver's seat with lumber support/passenger's sea:
Detach the harness clip (A). Pull the seat wire harness
(B) through a hole in the seat frame, and pull it out through the harness hole (C) in the seat-back cover
19. Pinch the tabs on the ends of the head restraint guides (A), and remove them from the seat-back.
20. Remove the seat-back cover/pad (A) from the seat-back frame (B).
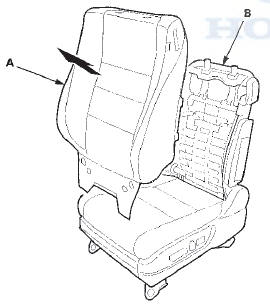
21. Pull back the edge of the seat-back cover (A) all the way around, and release the upholstery rings (B), then remove the cover.
NOTE: The leather seat cover is shown; the other types of seat covers are similar.
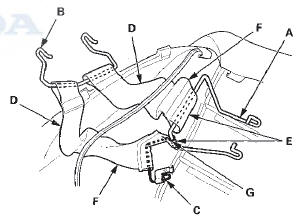
22. Remove airbag attachment wire B from the outside reinforcing cloths (D). Pull out airbag attachment wire A through the loops (E) of the inside reinforcing cloths (F) and through the loop (G) of airbag attachment wire C. Remove airbag attachment wires A and C.
23. Install the seat-back cover in the reverse order of removal, and note these items: - If the clip are damaged or stress-whitened, replace them with new ones.
- Push the clips and the hooks into place securely.
- Use only original Honda replacement seat-back covers..
- Before installing the seat-back cover, make sure airbag attachment wire A,B, and C are installed in the reinforcing cloths (D) correctly, and wire A and that wire C are securely assembled.
- Reinstall airbag attachment wires A and B, and the bracket (E) of attachment wire C, securely to the seat-back frame as shown.
- Make sure the side airbag harness and the seat wire harness are routed properly.
-To prevent wrinkles when installing the seat-back cover, make sure the material is stretched evenly over the pad before securing the upholstery rings, the hooks, and the hook strips.
- Replace all of the upholstery rings (F) fastening the seat-back cover (G) to the pad wires (H) with new ones using commercially available upholstery ring pliers (I).

Special Tools Required
-KTC Trim Tool Set SOJATP2014*
-Trim Pad Remover, Snap-on A 177A or equivalent, commercially available
*Available through the Honda Tool and Equipment Program; call 888-424-6857
4-door
SRS components are located in this area. Review the SRS component locations (see page 24-21) and the precautions and procedures (see page 24-25) before doing repairs or service.
Do the OPDS sensor initialization (see page 24-40), after front passenger's seat-back cover replacement.
NOTE: - Put on gloves to protect your hands.
- Take care not to tear or damage the seat covers.
- Passenger's seat: Do not touch the OPDS sensor in the seat-back cover/pad, and keep it away from oil. Oil can corrode the sensor causing it to fail.
- Use the appropriate tool from the KTC trim tool set to avoid damage when removing components.
- Driver's seat is shown; passenger's seat is similar.
1. Remove the front seat (see page 20-194).
2. With back panel: From underthe seat cushion, release the elastic strap (A) from the seat cushion frame springs (B), then pull back the under cover (C) of the back cover.
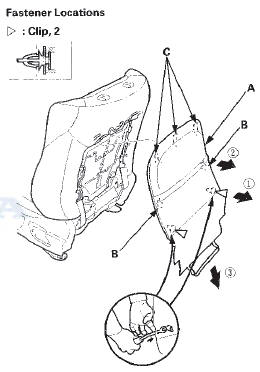
3. With back panel: Insert a trim pad remover between the bottom of the back panel (A) and the seat frame until it squarely engages one of the clips. Gently pry on the clip until it detaches from the seat frame.
Repeat for the other clip. Gently pull back the back panel to release the hooks (B), then pull down the panel to release the hooks (C).
NOTE: - The clips usually break during removal. Always replace the clips with new ones.
- Detach the clips and the hooks in the numbered sequence as shown.
- Take car not damage the back panel or the clip mounting pads.
4. Without back panel: Release the bottom hook (A), and unzip the seat-back cover (B).
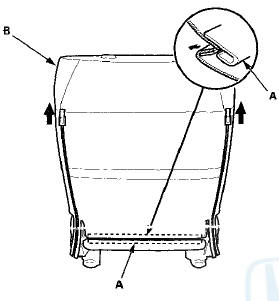
5. Release the Velcro.fasteners (A) and the hook strips (B), then loosen the seat-back cover (C).
NOTE: The front seat with leather seat cover and the back panel is shown; the other types of seats are similar.
6 Driver's seat with seat heater: Disconnect the seat-back heater connector (A), and detach the harness clip (B).
7. Remove the nut, then release the bracket (A) of airbag attachment wire C from the seat-back frame (B).
8. Release airbag attachment wire A and airbag attachment wire B from the seat-back frame (C).
9. Passenger's seat: Remove the ODS unit cover (A).
-1. Turn over the seat-back cover (B) and the pad (C) as needed.
-2. Release the cover from the lower hooks (D).
-3. Pull the cover upward to release it from the upper hook (E).
10. Passenger's seat: Disconnect the OPDS sensor connectors (F).
11. Passenger's seat: Detach the harness clips (A) fastening the OPDS sensor harnesses (B), and release the wire harness from the harness holder (C).
12. Pinch the tabs on the ends of the head restraint guides (A), and remove them from the seat-back.
13. Remove the seat-back cover/pad (A) from the seat-back frame (B).
14. Pull back the edge of the seat-back cover (A) all the way around, and release the clips (B), then remove the cover.
NOTE: The leather seat cover is shown; the other types of seat covers are similar.

15. Remove airbag attachment wire B from the outside reinforcing cloths (D). Pull out airbag attachment wire A through the loops (E) of the inside reinforcing cloths (F) and through the loop (G) of airbag attachment wire C. Remove airbag attachment wires A and C.

16. Install the seat-back cover in the reverse order of removal, and note these items: - If the clip are damaged or stress-whitened, replace them with new ones.
- Push the clips and the hooks into place securely.
- Use only original Honda replacement seat-back covers.
- Before installing the seat-back cover, make sure airbag attachment wire A,B, and C are installed in the reinforcing cloths (D) correctly, and wire A and that wire C are securely assembled.
- Reinstall airbag attachment wires A and B, and the bracket (E) of attachment wire C, securely to the seat-back frame as shown.
- Make sure the seat-back heater harness (if equipped), and OPDS sensor harness (passenger's seat) are routed properly.
- Replace any clips (F) you removed with new ones.
- To prevent wrinkles when installing the seat-back cover, make sure the material is stretched evenly over the pad before securing the clips, the hooks, and the hook strips.
 Front Seat Frame Replacement - Passenger's Seat
Special Tools Required
KTC Trim Tool Set SOJATP2014*
*Available through the Honda Tool and
Equipment
Program; call 888-424-6857
2-door
SRS components are located in this area. Review the
SRS c ...
 Front Seat Cushion Cover
Replacement
Front Seat Cushion Cover
Replacement
Special Tools Required
KTC Trim Tool Set SOJATP2014*
*Available through the Honda Tool and
Equipment
Program; call 888-424-6857
2-door
SRS components are located in this area. Review the
SRS c ...
See also:
Opening and Closing the Windows
Opening/Closing the Power Windows
The power windows can be opened and closed when the ignition switch is in ON
, using the switches on the doors.
The driver's side switches can be used to
open ...
Random Play
To play the tracks on the current
disc in random order, select TRACK
RANDOM, and press ENTER on the
interface selector. As a reminder,
you will see RANDOM next to
TRACK on the screen. To tur ...
General Troubleshooting Information
How to Use the Self-diagnostic Function
The HVAC control unit has a self-diagnostic function for the heating,
ventilation, and air conditioning system. To run the
self-diagnostic function, do the ...