 Honda Accord: Front Seat Active Head Restraint
Inspection
Honda Accord: Front Seat Active Head Restraint
Inspection
NOTE: If the vehicle has been in a collision, always inspect the active head restraint, even if they appear reusable, by doing the following procedure.
1. Driver's seat (manual height adjustable seat) /passenger's seat: Fold the seat-back forward, then recline the seat-back to the first lock position, and adjust the head restraint to the highest position.
2. Driver's seat (10-way power seat): Move the seat-back to the fully upright position. Raise the head restraint to the highest position.
3. Apply masking tape on the top of the head restraint.
4. Make marks (A) on both sides at 255 mm (10.0 in) upward from the roots of the head restraint frame (B) along the back of the head restraint (C) surface. Use the center point (D) between the two marks for the measurements in step 5.
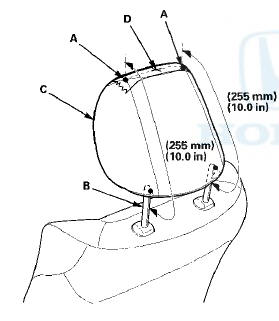
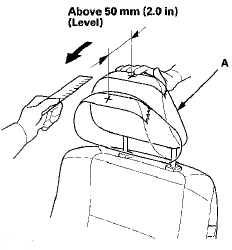
5. Push the head restraint (A) forward, and measure the horizontal head restraint movement. The head restraint should move more than 50 mm (2.0 in) without resistance. If it is less than 50 mm (2.0 in), or the head restraint does not move smoothly, replace the seat frame assembly: - Driver's seat (see page 20-208) - Passenger's seat: - 2-door (see page 20-211) - 4-door (see page 20-212)
 Component Location Index
2-door
4-door
...
 Front Seat Removal/Installation
Special Tools Required
KTC Trim Tool Set SOJATP2014*
*Available through the Honda Tool and
Equipment
Program; call 888-424-6857
SRS components are located in this area. Review the
SRS component ...
See also:
Transferring a Call
You can transfer a call from HFL to
your phone, or from your phone to
HFL.
Press and release the HFL Talk
button and say ‘‘Transfer.’’ ...
Symptom Troubleshooting Index
...
Playing Bluetooth® Audio
Your audio system allows you to listen to music from your
Bluetooth®-compatible
phone.
This function is available when the phone is paired and connected to the
vehicle's
Bluetooth® HandsFre ...