 Honda Accord: Component Replacement/Inspection After
Deployment
Honda Accord: Component Replacement/Inspection After
Deployment
NOTE: • Before doing any SRS repairs, check the DTCs (see page 24-36) for the less o b v i o u s deployed components (seat belt t e n s i o n e r s , front impact sensors, side airbag sensors, etc.) • Do not replace the ODS unit unless it is p h y s i c a l ly damaged or a s p e c i f i c fault was found d u r i n g DTC t r o u b l e s h o o t i n g .
• After a v e h i c l e c o l l i s i o n , do the ODS unit o p e r a t i on check (see page 24-41).
• After a v e h i c l e c o l l i s i o n , inspect the front seat active head restraints (see page 20-193).
After a c o l l i s i o n where the seat belt t e n s i o n e r s d e p l o y e d, replace these items:
• SRS unit
• Seat belt tensioners
• Front i m p a c t sensors
After a c o l l i s i o n w h e r e t h e f r o n t airbag(s) deployed, replace these items:
•SRS unit
• Deployed airbag(s)
• Seat belt tensioners
• Front impact sensors
After a c o l l i s i o n w h e r e t h e s i de airbag(s) d e p l o y e d, replace these items:
• SRS unit
• Side impact sensor(s) (first)
• Side impact sensor(s) (second)
• Front seat assembly (Impact side)
After a c o l l i s i o n w h e r e a s i de c u r t a i n airbag has d e p l o y e d , replace t h e i t e m s f o r t h e side(s) t h a t d e p l o y e d:
• SRS unit
• Deployed side c u r t a i n airbag(s)
• Seat belt tensioner(s)
• Side impact sensor(s) (first)
• Side impact sensor(s) (second)
• Rear s a f i n g sensor
• Roof t r im
• A-pillar trim
• B-pillar upper t r im (4-door)
• C-pillar rim
• Front grab handle
• Rear grab handle (4-door)
• All related t rim clips
• Sunvisor
After a m o d e r a t e t o severe side o r rear c o l l i s i o n , inspect f o r any d a m a g e o n t h e s i de c u r t a i n a i r b a g o r o t h er related components. Replace t h e c o m p o n e n t s as needed.
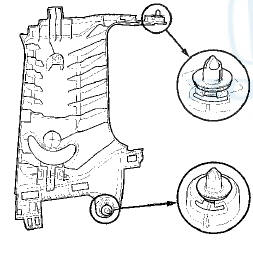
4-Door A-Pillar Trim
2-Door model is same as shown.
B-Pillar Trim
C-Pillar T r im
2-Door B-Pillar Upper Trim
C-Pillar Trim
During t h e repair process, inspect these areas: • Inspect all t h e SRS w i r e harnesses. Replace, d o not repair, a n y d a m a g e d harnesses.
• Inspect t h e cable reel f o r heat damage. If t h e re is a ny damage, replace t h e cable reel.
After t h e v e h i c l e is c o m p l e t e l y repaired, t u r n t h e i g n i t i on s w i t c h t o O N (II). If t h e SRS i n d i c a t o r comes o n f o r about 6 seconds a n d t h e n goes off, t h e SRS is OK. If t he indicator does not f u n c t i o n properly, use t he HDS to read t h e DTC (see page 24-37). If y o u cannot retrieve a code, d o t h e SRS S y m p t o m Troubleshooting.
Checking and Adjusting the Headliner/Pillar Trim Overlap
To prevent t h e s i de curtain airbag from deploying and damaging t h e pillar trim, the overlap between the headliner and p i l l a r t r im must be less t h e n 8 m m (0.3 i n ).
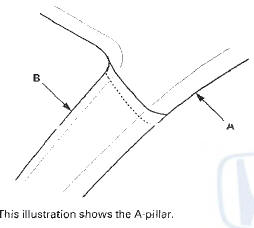
To check t he o v e r l a p , d o t h i s: 1. Install t h e headliner (A) a n d t h e p i l l a r t r im (B).
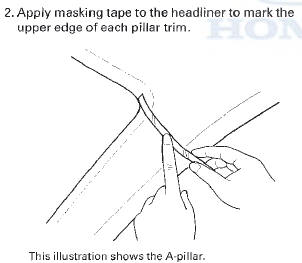
3. Remove t h e p i l l a r t r i m , a n d measure t h e headliner overlap.
• If t h e o v e r l a p is less t h a n 8 m m (0.3 i n ) , r e m o v e t he tape, a n d install t h e pillar t r i m.
• I f t h e o v e r l a p is m o r e t h a n 8 m m (0.3 i n ) , g o t o step 4.
This illustration shows the A-pillar.
4. Carefully t r im t h e headliner w i t h a u t i l i t y knife, r e d u c i n g t h e o v e r l a p t o less t h a n 8 m m (0.3 in).
This illustration shows the A-pillar.
5. Remove t h e t a p e , a n d install t h e p i l l a r t r i m.
 Symptom Troubleshooting
SRS indicator does not come on
NOTE: 2-door: Before replacing t h e SRS u n i t , check the
SRS u n i t software v e r s i o n w i t h t h e HDS. I f t h e software
v e r s i o n is not t h e lates ...
 Driver's Airbag Replacement
NOTE: If replacing the driver's airbag after deployment,
refer to Component Replacement/Inspection After
Deployment (see page 24-208) for a complete list of.
other parts that must also be replace ...
See also:
Mode Control Motor Replacement
1. Remove the blower unit (see page 21-65).
2. Disconnect the 7P connector (A) from the mode
control motor (B). Remove the self-tapping screws
and the mode control motor from the heater unit.
...
Idler Gear Shaft Bearing Replacement
Special Tools Required
-Adjustable Bearing Puller, 25—40 mm 07736-A01000B
•Driver Handle, 15 x 135L 07749-0010000
-Attachment, 52 x 55 mm 07746-0010400
1. Remove the idler gear shaft be ...
Drive Belt Auto-tensioner
Inspection
Special Tools Required
Belt Tension Release Tool Snap-on YA9317 or
equivalent, commercially available
1. Turn the ignition switch to ON (II), and make sure to
turn the A/C switch OFF. Turn the ign ...