 Honda Accord: Center Console Panel
Removal / Installation
Honda Accord: Center Console Panel
Removal / Installation
Special Tools Required
KTC Trim Tool Set SOJATP2014*
*Available through the Honda Tool and Equipment Program; call 888-424-6857
NOTE; - Put on gloves to protect your hands.
- Take care not to scratch the front seat, the dashboard, or the related parts.
- Use the appropriate tool from the KTC trim tool set to avoid damage when removing components.
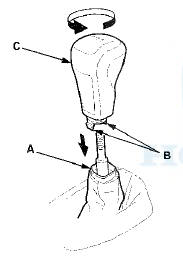
1. M/T: Lower the shift lever boot (A) to release the hooks (B) from the boot, then remove the shift knob (C).
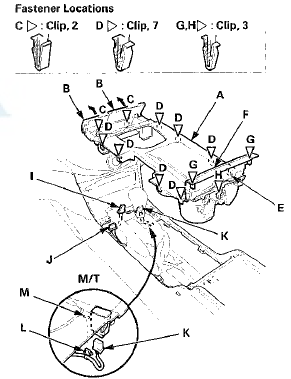
2. Remove the center console panel (A).
-1. Open the center pocket lids (B), and the center console armrest.
-2. Hold the center pocket lids and gently pull them up to detach the front clips (C).
-3. Detach the clips (D) and the hook (E) along the edge of the panel.
-4. Pry up on the rear corner edges of the console b o x trim (F) with the appropriate trim tool to detach the clips (G), and pull up the panel to detach the clip (H).
-5. Disconnect the front accessory power socket connector (I). With seat heater (for some models): Disconnect the driver's seat heater switch connector (J) and the front passenger's seat heater switch connector (K).
-6. M/T with seat heater: Detach the harness clip (L) fastening the front passenger's seat heater switch harness from the boot plate (M).
3. Remove the inner center pocket (A) from the center console panel (B) by pulling it up to release the hooks (C). Remove the screws, then remove the beverage holder (D) and the console box trim (E) from the panel.
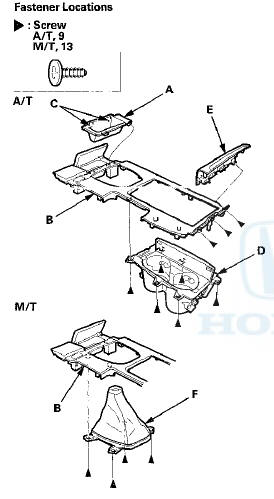
4. M/T: Remove the screws, then remove the shift lever boot (F).
5. Install the console panel in the reverse order of removal, and note these items: - If the clips are damaged or stress-whitened, replace them with new ones.
- Make sure each connector is plugged in properly.
- Push the clips and the hook into place securely.
 Consoles
...
 Center Console Removal/Installation
NOTE:
- Put on gloves to protect your hands.
- Take care not to scratch the front seat, the dashboard,
or the related parts.
1 . Remove these items:
- Center console panel (see page 20-157)
...
See also:
Power Windows
Turn the ignition switch to the ON
(II) position to raise or lower either
window. To open a window, push the
switch down and hold it. Release the
switch when you want the window to
stop. P ...
Ignition Key Light Test
1. Remove the steering column upper and lower covers
(see page 20-181).
2. Disconnect the 6P connector (A).
3. The LED should come on when power is connected to
terminal No. 6 and ground is co ...