 Honda Accord: To Use Maintenance MinderTM
• Displaying the Engine Oil Life
1. Set the power mode to ON.
2. Press the  (Information) button
repeatedly until the engine oil life appears
on the multi-information display.
(Information) button
repeatedly until the engine oil life appears
on the multi-information display.
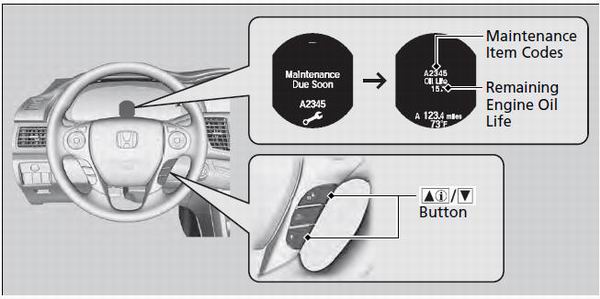
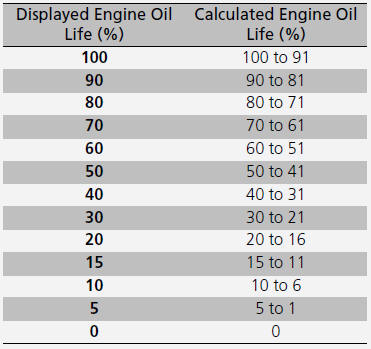
Based on the engine operating conditions, the remaining engine oil life is calculated and displayed as a percentage.
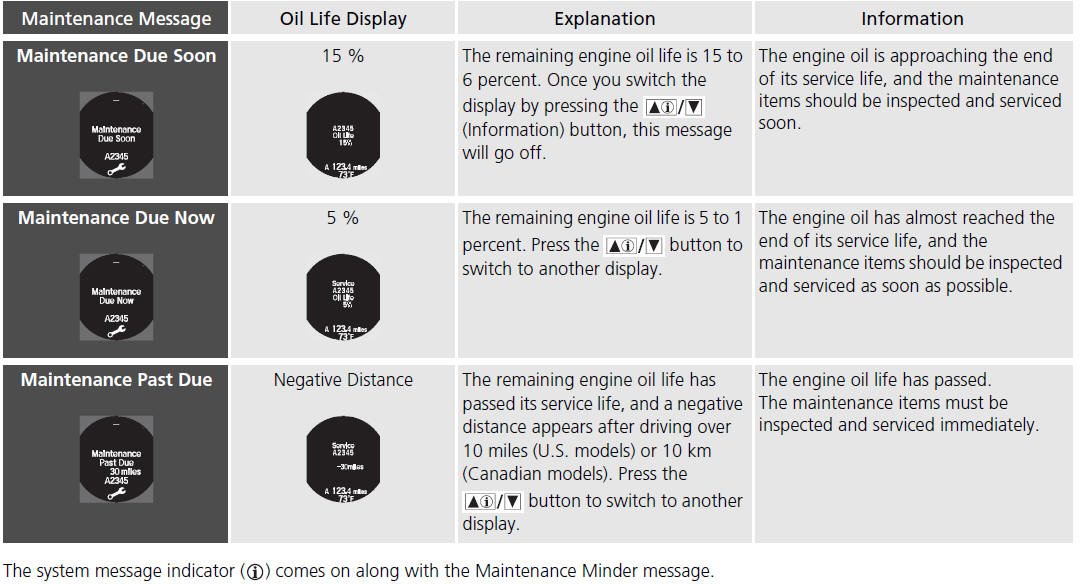
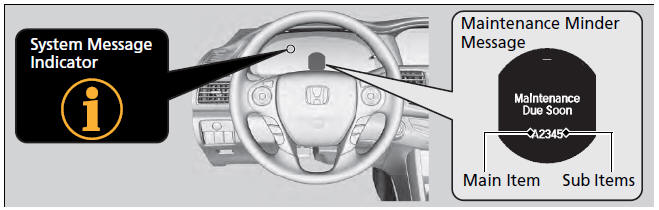
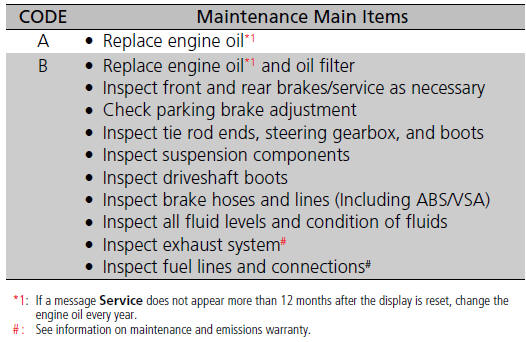
• Maintenance Minder Messages on the Multi-Information Display
• Maintenance Service Items
• Independent of the Maintenance Minder
information, replace the brake fluid every 3 years.
• Inspect idle speed every 160,000 miles (256,000
km).
• Adjust the valves during services A, B, 1, 2, or 3 if
they are noisy.

• Resetting the Display
Reset the engine oil life display if you have performed the maintenance service.
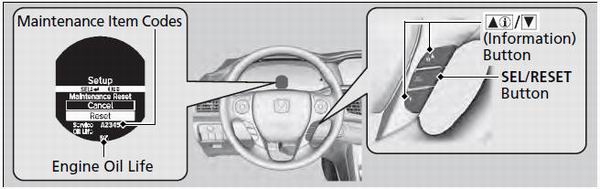
1. Set the power mode to ON.
2. Press  button to select
Vehicle Settings, then press the SEL/RESET
button.
button to select
Vehicle Settings, then press the SEL/RESET
button.
3. Press the  button until
Maintenance Reset appears on the display.
button until
Maintenance Reset appears on the display.
4. Press the SEL/RESET button.
- The oil life reset mode is displayed on the multi-information display.
5. Select Reset with the  button, then press the SEL/RESET button.
- The displayed maintenance items disappear, and the engine oil life display
returns to 100%.
To cancel the oil life reset mode, select Cancel, then press the SEL/RESET button.
NOTICE
Failure to reset the engine oil life after a maintenance service results in the system showing incorrect maintenance intervals, which can lead to serious mechanical problems.
The dealer will reset the engine oil life display after completing the required maintenance service. If someone other than a dealer performs maintenance service, reset the engine oil life display yourself.
You can reset the engine oil life display using the audio/information screen.
 To Use Maintenance MinderTM
• Displaying the Engine Oil Life
1. Turn the ignition switch to ON
.
2. Press the (Select/Reset) knob
repeatedly
until the engine oil life appears on the
information display.
The Maint ...

See also:
Tire Rotation
Rotating tires according to the maintenance messages on the information
display*/
multi-information display* helps to distribute wear more evenly and increase
tire life.
Tires with directional ...
Dust and Pollen Filter Replacement
1. Open the glove box. Remove the glove box stop on
the right side, then let the glove box hang down (see
page 20-174).
2. Remove the dust and pollen filter assembly (A) from
the blower unit.
...