 Honda Accord: Power Transistor Test
1. Remove the passenger's dashboard undercover (see page 20-170).
2. Disconnect the 4P connector from the power transistor.
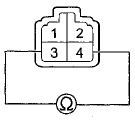
3. Measure the resistance between terminals No. 3 and No. 4 of the power transistor. It should be about 1.5 kO.
• If the resistance is within the specifications, go to step 4.
• If the resistance is not within the specifications, replace the power transistor.
NOTE: Also check the blower motor. Power transistor failure can be caused by a defective blower motor.
POWER TRANSISTOR

4. Carefully release the lock tab on terminal No. 1 (PUR) (A) in the 4P connector, then remove the terminal and insulate it from body ground.

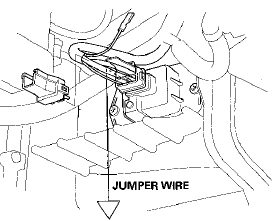
(To 12 V Power source on vehicle)
5. Reconnect the 4P connector to the power transistor.
6. Make sure the PUR wire is completely isolated, then supply 12 V to cavity No. 1 with a jumper wire.
7 Turn the ignition switch to ON (II), and check that the blower motor runs.
• If the blower motor does not run, replace the power transistor.
NOTE: A faulty blower motor can cause the power transistor to fail. If the power transistor is replaced, also check the blower motor for binding, and replace it if necessary.
• If the blower motor runs, the power transistor is OK.
 Evaporator Temperature Sensor Test
NOTE: Before testing the sensor, check for HVAC DTCs
(see page 2 1 - 9).
1. Remove the evaporator temperature sensor (see
page 21-67).
2. Dip the sensor in ice water, and measure the
resistan ...
 Air Mix Control Motor Test
NOTE: Before testing the motor, check for HVAC DTCs
(see page 21-9).
1. Disconnect the 7P connector from the air mix control
motor.
Incorrectly applying power and ground to the air mix
contro ...
See also:
License Plate Light Replacement
4-door
1. Poll the license plate light assembly out, and
disconnect the 2P connector (A) from the license plate
light.
License Plate Light: 5W
2. Separate the lens (B) and housing (C), then rem ...
Adjusting the Sound
1. Press the SETTINGS button.
2. Rotate to select Audio
Settings, then
press .
3. Rotate to select Sound,
then press .
Rotate to scroll through the
following
choices:
The SVC ...
Transmission Removal
Special Tools Required
-Engine Hanger Adapter VSB02C000015*
-Engine Support Hanger, A and Reds AAR-T1256*
- Subframe Adapter VSB02C000016*
*: Available through the Honda Tool and Equipment
Progra ...
