 Honda Accord: MIL Circuit Troubleshooting
1. Turn the ignition switch to ON (II).
2. Do the gauge self-diagnostic function (see page 22-332).
Does the MIL indicator flash? YES
-Go to step 3.
NO
-Substitute a known-good gauge control module, and recheck. If the symptom/indication goes away with a known-good gauge control module, replace the original gauge control module (see page 22-351 ) . 3. Connect the HDS to the DLC (see page 11-3).
4. Check the SCS in the DATA LIST with the HDS.
Is a short indicated? YES
-Go to step 5.
NO
-Update the ECM/PCM if it does not have the latest software (see page 11-203), or substitute a known-good ECM/PCM (see page 11-7), then recheck.
If the symptom/indication goes away and the ECM/PCM was updated, troubleshooting is complete.
If the symptom/indication goes away and the ECM/PCM was substituted, replace the original ECM/PCM (see page 11-204).
5. Turn the ignition switch to LOCK (0).
6. Disconnect ECM/PCM connector A (49P), then disconnect the HDS.
7. Check for continuity between ECM/PCM connector terminal A32 and body ground.
ECM/PCM CONNECTOR A (49P)
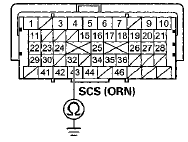
Terminal side of female terminals
Is there continuity? YES
-Repair short in the wire between the ECM/PCM (A32) and the DLC.
NO
-Update the ECM/PCM if it does not have the latest software (see page 11 -203), or substitute a known-good ECM/PCM (see page 11-7), then recheck.
If the symptom/indication goes away and the ECM/PCM was updated, troubleshooting is complete.
If the symptom/indication goes away and the ECM/PCM was substituted, replace the original ECM/PCM (see page 11-204).
 F-CAN Circuit Troubleshooting
1. Turn the ignition switch to LOCK (0).
2. Jump the SCS line with the HDS.
3. Disconnect ECM/PCM connector A (49P).
4. Measure the resistance between ECM/PCM connector
terminals A3 and A4.
...
 DLC Circuit Troubleshooting
NOTE: If you suspect the HDS or the HDS DLC cable may
be the source of the communication probrem, verify that
they are working properly by connecting them to a
known-good, like vehicle and system, ...
See also:
Change Lever Clearance Inspection
1. Measure the clearance between the change lever (A)
and the select lever (B) with a feeler gauge (C). If the
clearance exceeds the service limit, go to step 2.
Standard: 0.05-”0.25 mm (0.002 ...
Center Console Rear Trim
Removal/Installation
Special Tools Required
KTC Trim Tool Set SOJATP2014*
*Available through the Honda Tool and
Equipment
Program; call 888-424-6857
NOTE:
- Take care not to scratch the center console and the
rela ...
USB Flash Memory Device Error Messages
If you see an error message on the
audio display while playing a USB
flash memory device, find the
solution in the chart to the right. If
you cannot clear the error message,
take your vehicl ...