 Honda Accord: Fuel Line/Quick-Connect Fitting
Installation
Honda Accord: Fuel Line/Quick-Connect Fitting
Installation
NOTE: Before you work on the fuel lines and fittings, read the Fuel Line/Quick-Connect Fitting Precautions (see page 11-313).
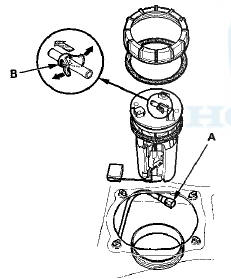
1. Check the contact area (A) of the line (B) for dirt or damage, and clean it if needed.
2. Insert a new retainer (A) into the connector (B) if the retainer is damaged, or after: - replacing the fuel rail.
- replacing the fuel line.
- replacing the fuel pump.
- replacing the fuel filter.
- replacing the EVAP canister.
- replacing the fuel fill pipe.
- replacing the fuel tank.
- removing the retainer from the line.
Use the same manufacturer retainer and the same size when the replacing the retainer (see page 11-314).

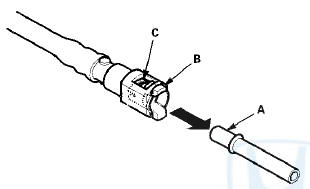
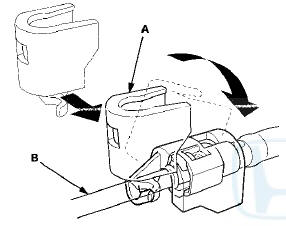
4. Align the quick-connect fittings with the line (A), and align the retainer locking tabs (B) with the connector grooves (C). Then press the quick-connect fittings onto the line until both retainer tabs lock with a . clicking sound.
NOTE: If it is hard to connect put a small amount of new engine oil on the line end.
Connection with new retainer
Connection with new retainer: Fuel fill neck tube (PZEV model)
Connection to new fuel line
Connection to new fuel line: Fuel fill neck tube (PZEV model)
Reconnecteon to existing retainer
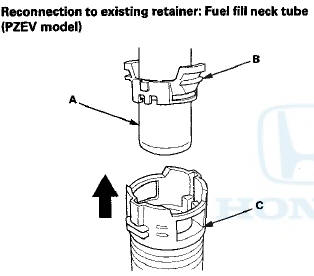
5. When you reconnect the connector with the old retainer, make sure the connection is secure and the tabs (A) are firmly locked into place; check visually and also by pulling the connector (B). When you replace the fuel line with a new one, make sure you remove the ring pull (C) upwards after you confirm the connection is secure.
NOTE: Before you remove the ring pull, make sure the fuel line connection is secure. If the connection is not secure, the ring pull could break when you try to remove it.
Connection to new fuel line
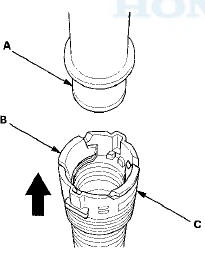
6. Reconnect the negative cable to the battery, and turn the ignition switch to ON (11) (but do not operate the starter motor). The fuel pump runs for about 2 seconds, and fuel pressure rises. Repeat this two or three times, then make sure there are no fuel leaks, 7. If equipped, install the quick-connect fitting cover. Set the groove of the cover (A) on the fuel line (B) as shown, then install it. Make sure the cover is firmly locked in place.
 Fuel Line/Quick-Connect Fitting
Removal
Fuel Line/Quick-Connect Fitting
Removal
NOTE: Before you work on the fuel lines and fittings,
read the Fuel Line/Quick-Connect Fitting Precautions
(see page 11-313).
1. If equipped, remove the quick-connect fitting cover
from the fuel ...
 Fuel Tank Unit Removal and
Installation
Fuel Tank Unit Removal and
Installation
Special Tools Required
Fuel Sender Wrench 07AAA-S0XA100
Removal
1. Relieve the fuel pressure (see page 11-306).
2. Remove the fuel fill cap.
3. Remove the rear seat cushion (see page 20-241). ...
See also:
Maintenance MinderTM
If the engine oil life is less than 15%, you will see the Maintenance Minder
messages
appear on the information display* or the multi-information display* every time
you
turn the ignition swit ...
Connector to Harness Index
Starter Subharness
Engine Wire Harness (M/T)
Engine Wire Harness ( A / T )
*1: PZEV
*2: Except PZEV
CKP Sensor Subharness
Shift Solenoid Wire Harness (A/T)
Transmission Rang ...
Wiper Blades
Check the condition of the wiper
blades at least every six months.
Replace them if you find signs of
cracking in the rubber, areas that are
getting hard, or if they leave streaks
and unwiped ...