 Honda Accord: Front Passenger's Power Window
Switch Replacement
Honda Accord: Front Passenger's Power Window
Switch Replacement
4-door
1. Carefully remove the front passenger's power window switch (A).
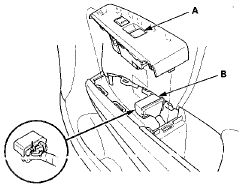
2. Disconnect the 37P connector (B) from the front passenger's power window switch.
3. Remove the four screws and the front passenger's power window switch (A).

4. Install the switch in the reverse order of removal.
5. With AUTO UP/AUTO DOWN function; Reset the power window control unit (see page 22-280).

1. Remove the passenger's door panel (see page 20-12).
2. Disconnect the 37P connector (A) from the passenger's power window switch (B).
3. Remove the switch panel and armrest from the door panel (see page 20-12).
4. Remove the four screws and the passenger's power window switch (A).
5. Install the switch in the reverse order of removal.
6. With AUTO UP/AUTO DOWN function: Reset the power window control unit (see page 22-280).
 Power Window Master Switch
Replacement
Power Window Master Switch
Replacement
4-door
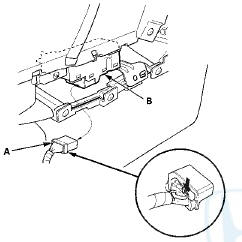
1. Carefully remove the power window master switch
(A).
2. Disconnect the 37P connector (B) from the power
window master switch, and the 13P connector (C)
from the power mirror switch (D ...
 Rear Power Window Switch
Test/Replacement
Rear Power Window Switch
Test/Replacement
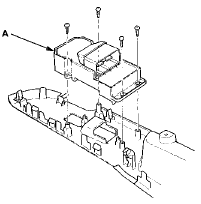
1. Carefully remove the rear power window switch (A).
2. Disconnect the 14P connector (B) from the rear power
window switch.
3. Remove the three screws and the rear power window
switch (A).
...
See also:
Fuse/Relay Boxes
Connector to Fuse/Relay Box Index
Under-hood Fuse/Relay Box
*: '08-09 models
Driver's Under-dash Fuse/Relay B O M
Passenger's Under-dash Fuse/Relay Box
*1: LX, LX PZEV, LX-P, LX-P PZE ...
Defaulting All the Settings
Reset all the menu and customized settings as the factory defaults.
1. Press the SETTINGS button.
2. Rotate to select System
Settings, then
press .
3. Rotate to select Factory data
rese ...
To Use Maintenance MinderTM
• Displaying the Engine Oil Life
1. Turn the ignition switch to ON
.
2. Press the (Select/Reset) knob
repeatedly
until the engine oil life appears on the
information display.
The Maint ...