 Honda Accord: Display Setup
You can change the brightness or color theme of the audio/information screen.
• Changing the Screen Brightness
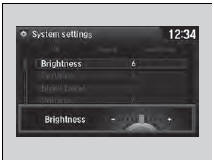
1. Press the SETTINGS button.
2. Rotate  to select System
Settings, then
press
to select System
Settings, then
press  .
.
3. Rotate  to select Brightness,
then
press .
to select Brightness,
then
press .
4. Rotate to adjust the
setting.
to adjust the
setting.
• Changing the Screen’s Color Theme
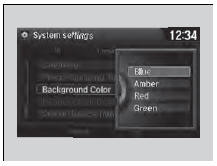
1. Press the SETTINGS button.
2. Rotate to select System
Settings, then
press .
3. Rotate to select Background
Color,, then
press .
4. Rotate to select the
setting you want,
then press  .
.
You can change the Contrast and Black Level settings in the same manner.
 Adjusting the Sound
1. Press the SETTINGS button.
2. Rotate to select Audio
Settings, then
press .
3. Rotate to select Sound,
then press .
Rotate to scroll through the
following
choices:
The SVC ...
 Voice Control Operation
Your vehicle has a voice control system that allows hands-free operation of
most of
the navigation system functions.
The voice control system uses the
(Talk) and (hang-up/back) buttons
on ...
See also:
MIL Circuit Troubleshooting
1. Turn the ignition switch to ON (II).
2. Do the gauge self-diagnostic function (see page
22-332).
Does the MIL indicator flash?
YES-Go to step 3.
NO-Substitute a known-good gauge control ...
Front Seat Recline Motor Replacement
Driver's Seat (10-way Power Seat)
SRS components are located in this area. Review the
SRS component locations, 2-door (see page 24-23),
4-door (see page 24-21) and the precautions and
procedures ( ...