 Honda Accord: Compass Calibration
If the compass indicates the wrong direction, or the CAL indicator blinks, you need to manually calibrate the system.
Compass operation can be affected under the following conditions:
• Driving near power lines or stations
• Crossing a bridge
• Passing a large vehicle, or driving near a large
object that can cause a magnetic disturbance
• When accessories such as antennas and roof racks
are mounted by magnets
1. Set the power mode to ON.
2. On the top screen of any audio source,
press and hold  for 5 seconds.
- The display switches to the Compass
Settings screen.
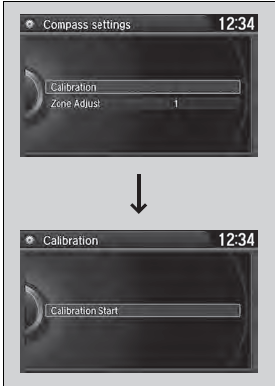
3. Rotate  to select Calibration,
then press .
to select Calibration,
then press .
4. When the display changes to Calibration
Start, press .
5. Drive the vehicle slowly in two circles.
- The compass starts to show a direction
after the calibration. The CAL indicator
goes off.
Calibrate the compass in an open area.
While setting the compass, press the BACK button to cancel the setting mode and return to the previous screen.
 Compass*
When you set the power mode to ON, the compass self-calibrates, and the
compass
display appears. ...
 Compass Zone Selection
1. Set the power mode to ON.
2. On the top screen of any audio source,
press and hold for 5
seconds.
- The display switches to the Compass
Settings screen.
3. Rotate to sele ...
See also:
Seat Belt Inspection
Regularly check the condition of your seat belts as follows:
• Pull each belt out fully, and look for frays, cuts, burns, and wear.
• Check that the latches work smoothly and the belts retract ...
Malfunction Indicator Lamp
If the indicator comes on
while driving, it means one
of the engine’s emissions control
systems may have a problem. Even
though you may feel no difference in
your vehicle’s performance ...
Ignition Key Switch Test
1. Remove the steering column upper and lower covers
(see page 20-181).
2. Disconnect the 6P connector (A).
3. Check for continuity between terminals No. 1 and No.
2.
• There should ...