 Honda Accord: Climate Control Power and Ground
Circuit Troubleshooting
1. Check the No. 16 (7.5 A) fuse in the driver's under-dash fuse/ relay box.
is the fuse OK? YES
-Go to step 2.
NO
-Replace the fuse, and recheck. If the fuse blows again, check for a short in the No. 16 (7.5 A) fuse circuit.
2. Disconnect climate control unit connector A (28P).
3. Turn the ignition switch to ON (II).
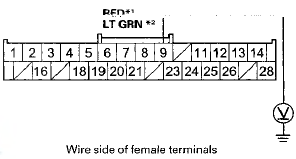
4. Measure the voltage between climate control unit connector A (28P) terminal No. 9 and body ground.
CLIMATE CONTROL UNIT CONNECTOR A (28P)

* 1 : With navigation
*2: Without navigation
Is there battery voltage? YES
-Go to step 5.
NO
-Repair an open in the wire between the No. 16 (7.5 A) fuse in the driver's under-dash fuse/relay box and the climate control u n i t .
5. Turn the ignition switch to LOCK (0).
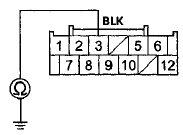
6. Check for continuity between .-climate control unit connector B (12P) terminal No. 3 and body ground.
CLIMATE CONTROL UNIT CONNECTOR B (12P)

Wire side of female terminals
Is there continuity? YES
-Check for loose wires or poor connections at climate control unit connector B (12P). If the connections are good, substitute a known-good climate control unit (with navigation) (see page 21-190), (without navigation) (see page 21-191), and recheck.
NO
-Check for an open in the wire between the climate control unit and body ground. If the wire is OK, check for poor ground at G401 (see page 22-40).
 DTC Troubleshooting
DTC indicator A: Climate Control Unit Internal
Error
NOTE: Check the battery condition (see page 22-90) and
the charging system (see page 4-25).
1. Turn the ignition switch to LOCK (0), and then ...
 Navigation Communication Line Circuit
Troubleshooting
1. Operate the climate control system in several modes.
Is the climate control system OK?
YES-Go to step 2.
NO-Do the self-diagnostic function with the HDS (see
page 21-102) or climate control ...
See also:
Engine Oil Life Display
To see the current engine oil life,
turn the ignition switch to the ON
(II) position, then press and release
the select/reset knob repeatedly
until the engine oil life indicator
appears.
...
Center Pocket
Pull up the lid to open each pocket. ...
If a Tire Goes Flat
Changing a Flat Tire
If a tire goes flat while driving, grasp the steering wheel firmly, and brake
gradually
to reduce speed. Then, stop in a safe place. Replace the flat tire with a
compact
...
